
Hardware
LoDi-8-GBM-P v2
Update early 2025:
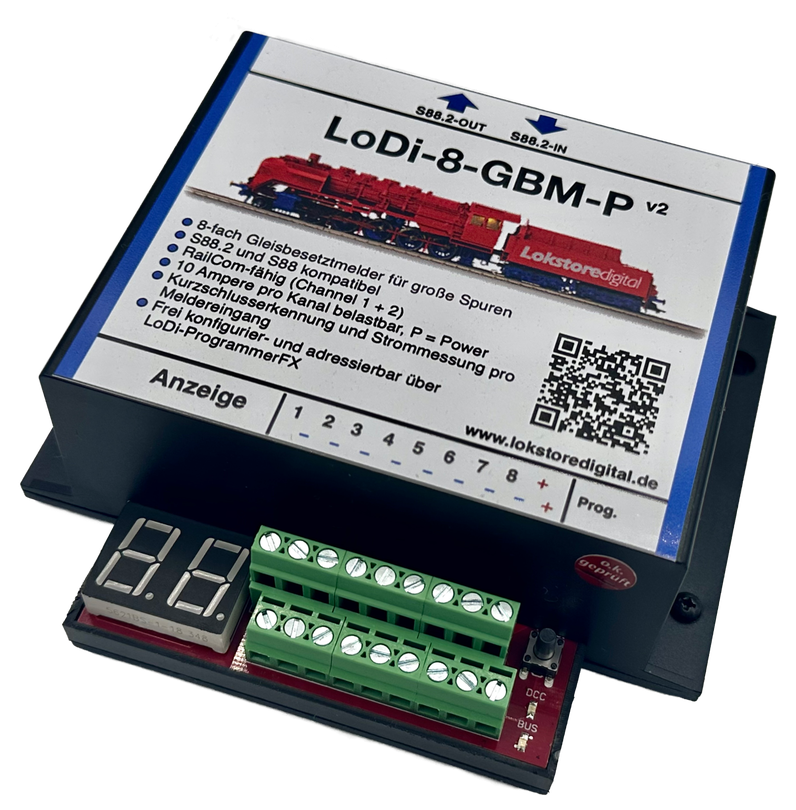
Our LoDi-8-GBM-P gets an update too: the LoDi-8-GBM-P v2. It is now fully updatable and prepared for DCC-A.
The big brother of the LoDi-8-GBM v2 is the LoDi-8-GBM-P v2, in a completely reworked version developed specifically for large scales.
Garden railway modellers who want to run their locomotives RailCom capable can now do so with the LoDi-8-GBM-P v2.
In garden railway use in particular it offers a very handy option of presets that can be called up with a mouse click — should you want to run the railway on a rainy day, for instance.
Features of the LoDi-8-GBM-P v2
- The LoDi-8-GBM-P v2 is an occupancy detector developed for the S88.2 bus.
- It serves 8 track sections, each of which can carry 10 amperes. (No more than 20 amperes in total.)
- All 8 track sections, that is detection channels, are RailCom capable and can be monitored over channels 1 and 2. (With channel 2 a maximum of 8 locomotives per detection channel can be identified.)
- Beyond that the occupancy detector also delivers a precise current draw per track section, and can even detect short circuits within the block itself.
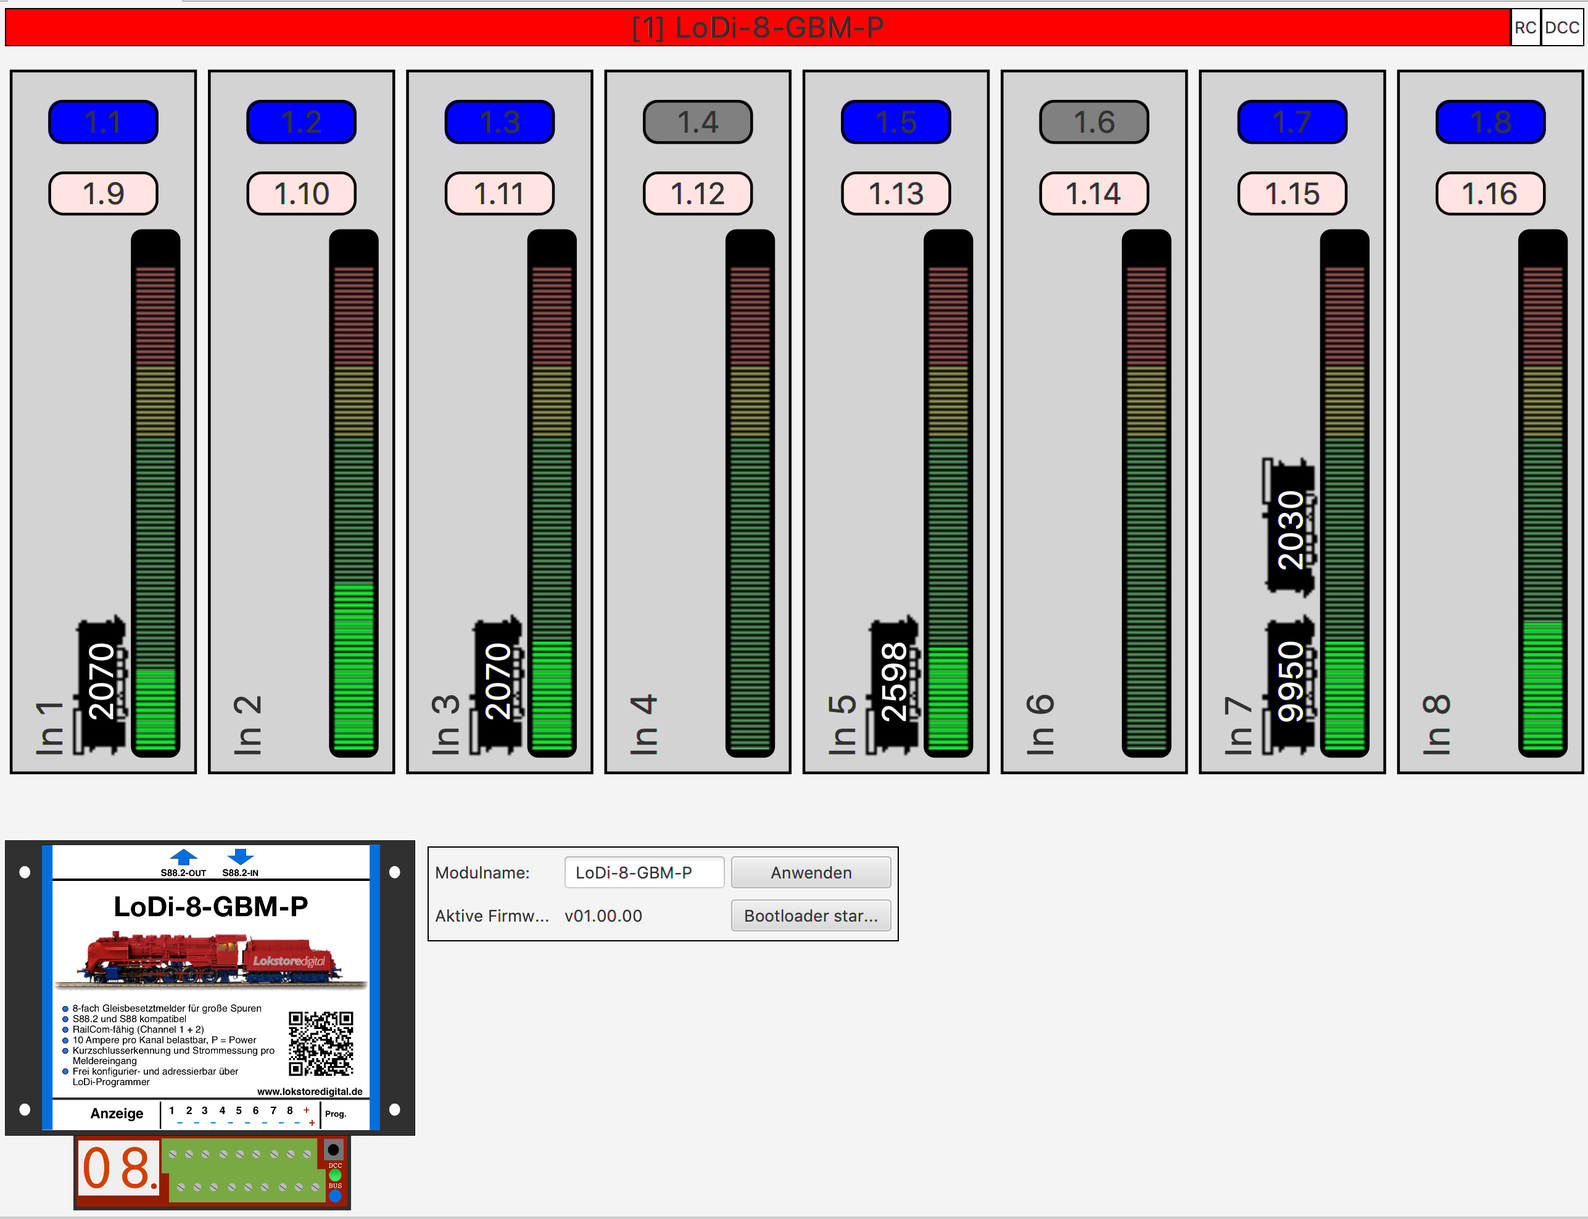
- The LoDi-8-GBM-P v2 is easily configured through the LoDi-ProgrammerFX.
- It has a display for checking the detectors directly and showing the module's address.
- It is fully backwards compatible and can equally be run on s88N or, with an adapter, on an old s88 bus. There you will not have the full functions of the S88.2 bus, however.
- Prepared for DCC-A and fully updatable.
1. The LoDi-8-GBM-P v2 and its connections
About the connections on the LoDi-8-GBM-P v2:
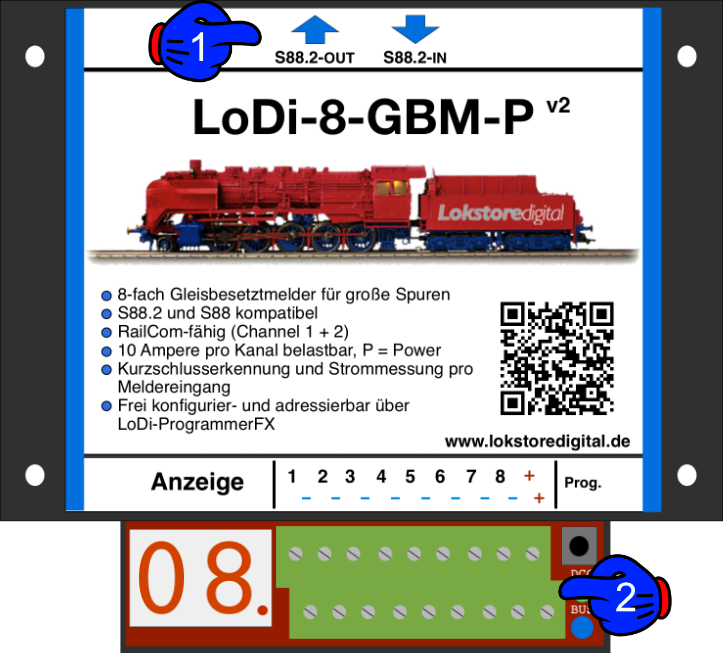
- (1): the S88.2 bus connects here. The S88.2-OUT arrow points towards the interface, since this is where the data from the track is reported back to the computer. The LoDi-8-GBM-P v2 is of course s88N compatible too; you can simply integrate it into existing layouts, but will then not have all the benefits of the new S88.2 bus.
- (2): the block sections, or detection sections, connect at 1–8 here, and the booster IN voltage to their right at +. You will find more under track connection below.
2. The LoDi-8-GBM-P v2 and its LEDs
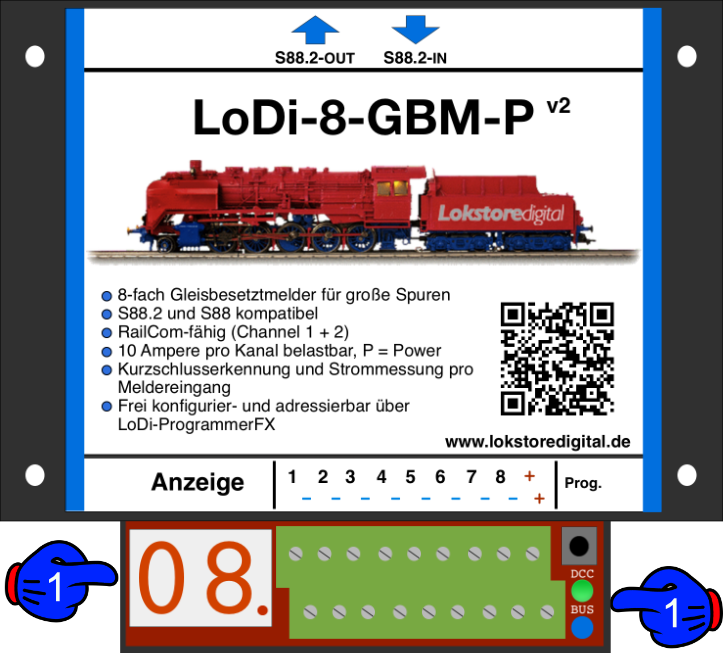
- (1) DCC LED and BUS LED: the bus LED lights as soon as the S88.2 bus is plugged in and supplied with power. The bus LED then glows a light blue. The DCC LED lights as soon as booster voltage is present at the module.
- (2) Display: during operation this shows the detector currently occupied. The dot to the right of the number shows whether the module has detected the bus.
3. Connecting the LoDi-8-GBM-P v2 to the S88.2 bus
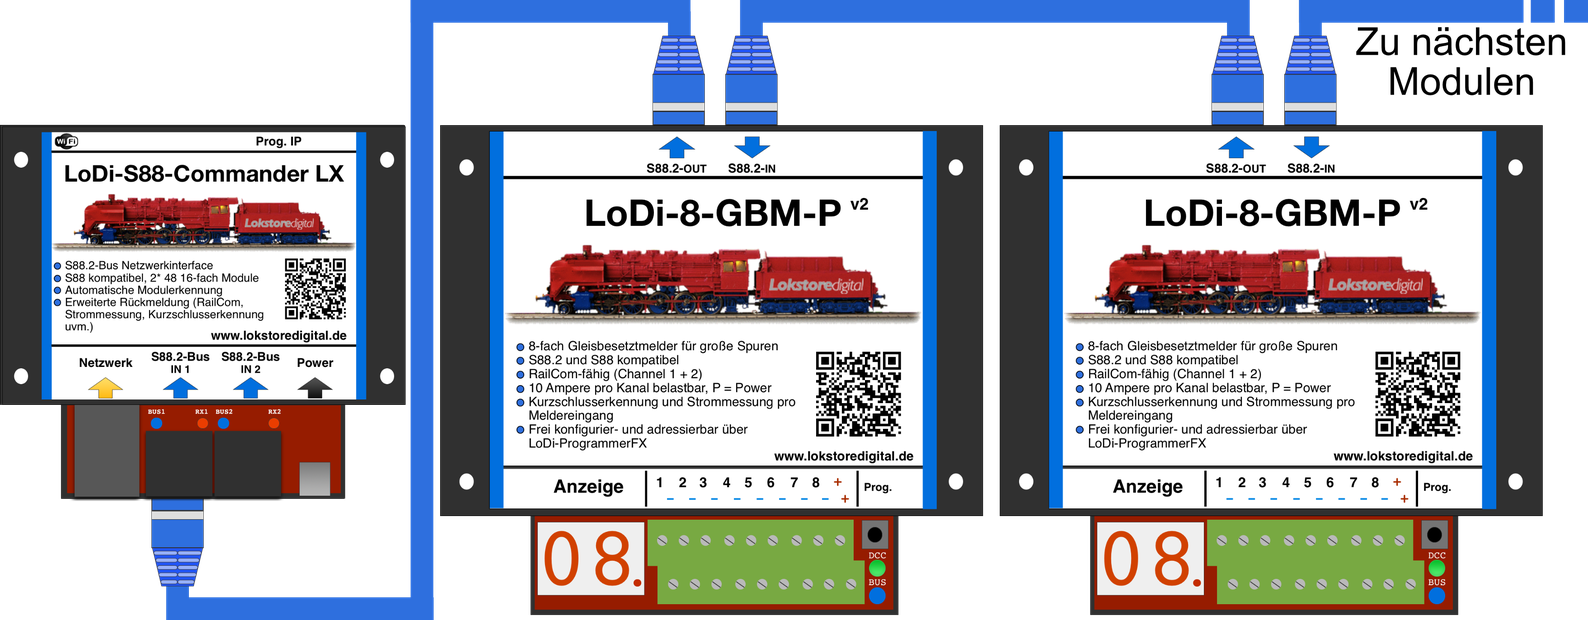
As mentioned several times, the LoDi-8-GBM-P v2 carries the S88.2 bus. That is provided by the LoDi-S88-Commander LX. The patch cables between two modules may be up to 100 metres long; the S88.2 bus is a powerful feedback bus allowing total cable lengths of more than 1000 metres. Perfect for garden railways!
The LoDi-8-GBM-P v2 can be run mixed with the LoDi-8-GBM-P.
When the module is run on an S88.2 bus, the following features are available to you:
- Occupancy reporting of the individual blocks with a display.
- Short-circuit detection for the individual blocks. This works through a further register, which means: should a short be detected on output 1.1, for instance, 1.9 is reported as occupied. The short can therefore already be displayed by any control software.
- Current measurement per detection channel, with the option of displaying it in the software.
- Setting the short-circuit thresholds per detection channel.
- Setting the current detection threshold per detection channel
- RailCom detection on channels 1 and 2 per detection channel (max. 8 locomotives per detection channel).
- Freely addressable — the module now keeps its address, there are no more shifts!
- Up to 96 modules can be connected to one LoDi-S88-Commander LX.
- All S88.2 modules from 2022 onwards are updatable and therefore future-proof.
4. Connecting the LoDi-8-GBM-P v2 to the s88 and s88N bus
The LoDi-8-GBM-P v2 is fitted with the new S88.2 bus, which does not mean the module cannot also be run on conventional command stations with s88 or s88N.
These functions are available to you when running on the old s88 bus:
- Occupancy reporting of the individual blocks with a display
- Short-circuit detection for the individual blocks, here too through a further register, which means: if a short is detected on output 1.1, for instance, 1.9 is reported as occupied. The short can therefore already be displayed by any control software.
Here you see a LoDi-8-GBM-P v2 connected to an LDT-HSI. Any kind of s88N module can of course be hung in between.
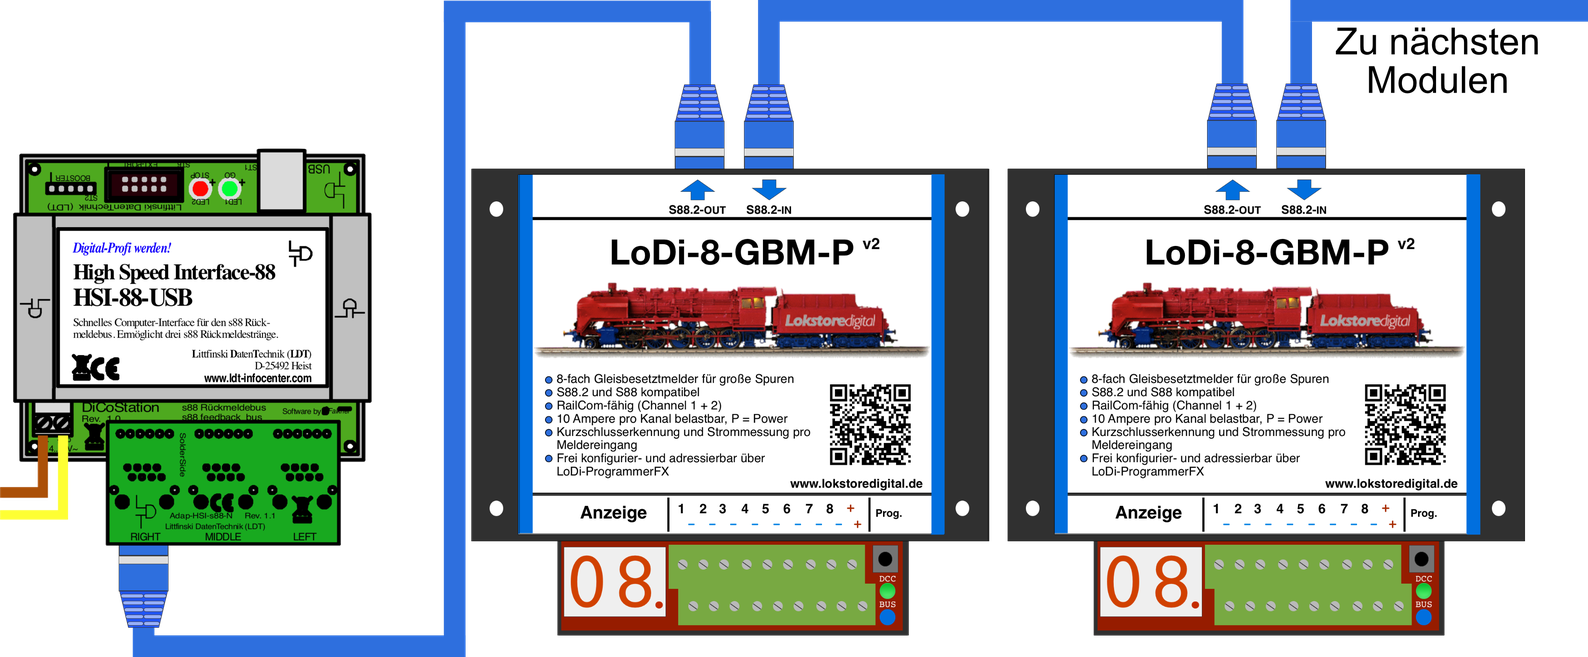
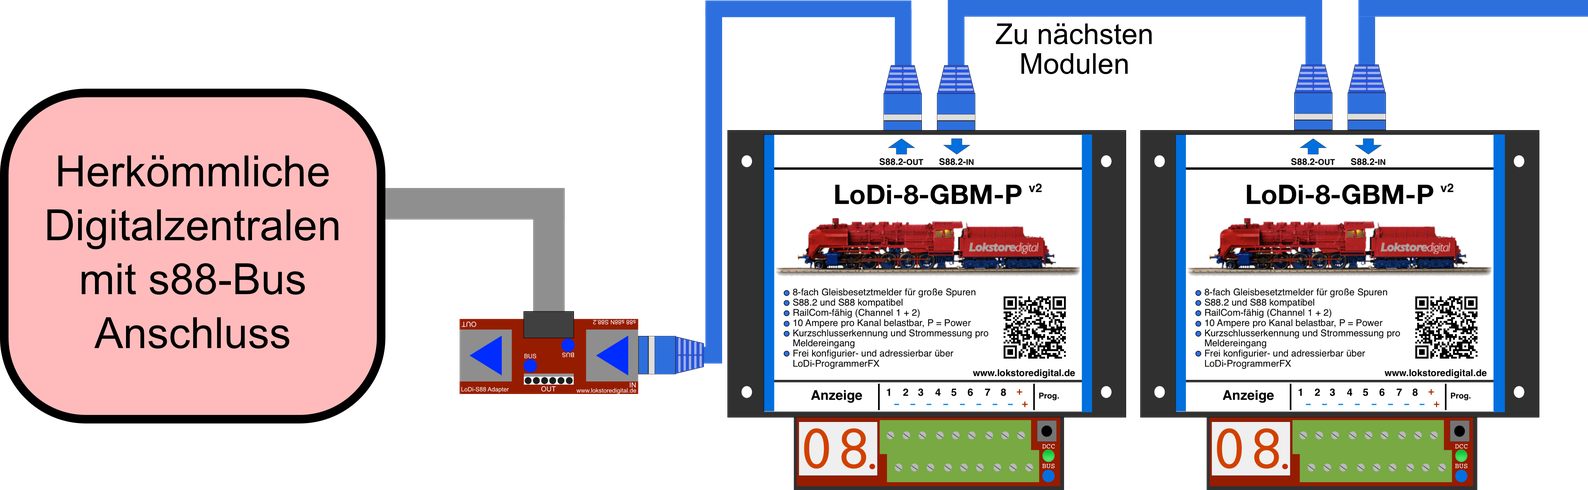
It is possible to connect the LoDi-8-GBM-P v2 to a conventional command station. To use the devices on an older station without the s88N connector, you need an adapter.
We offer the LoDi-S88 adapter for that, which can be used universally
5. Connecting booster voltage to the LoDi-8-GBM-P v2
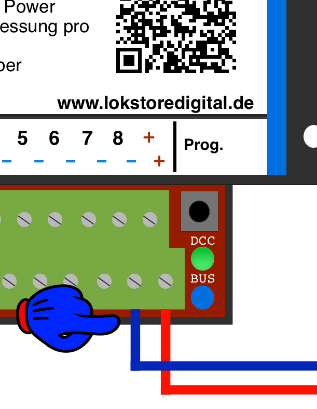
The LoDi-8-GBM-P v2 has booster input terminals. A booster or a conventional command station has to be connected to these.
The LoDi-8-GBM-P v2 has two + terminals and eight − terminals in total.
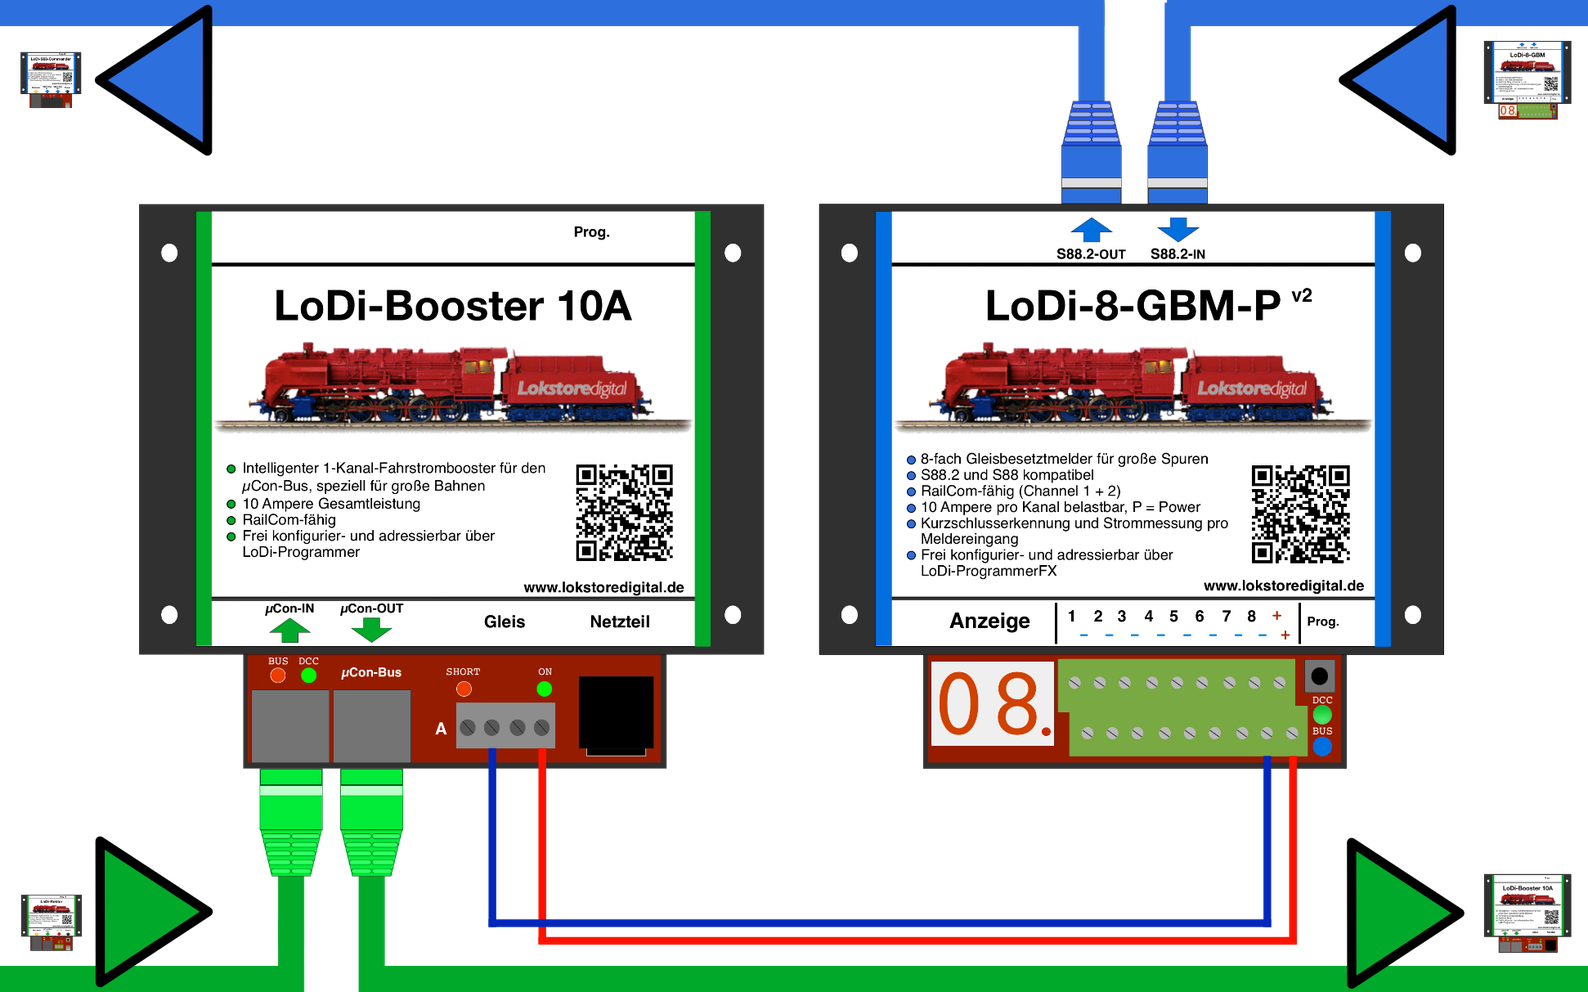
If you use a LoDi-Booster 10A(+), you can connect the detector as shown in the picture. One pair of terminals (+, −) can carry 10 amperes.
The first example shows the LoDi-Booster 10A supplying the LoDi-8-GBM-P v2 with power.
Please take care that the red wire, that is the + connection, is connected to the right-hand booster terminal at the output. If the red wire is on the other side, it can affect the RailCom signal.
Careful! Never use cable cross-sections smaller than 0.75 mm²!
We recommend 1 mm².
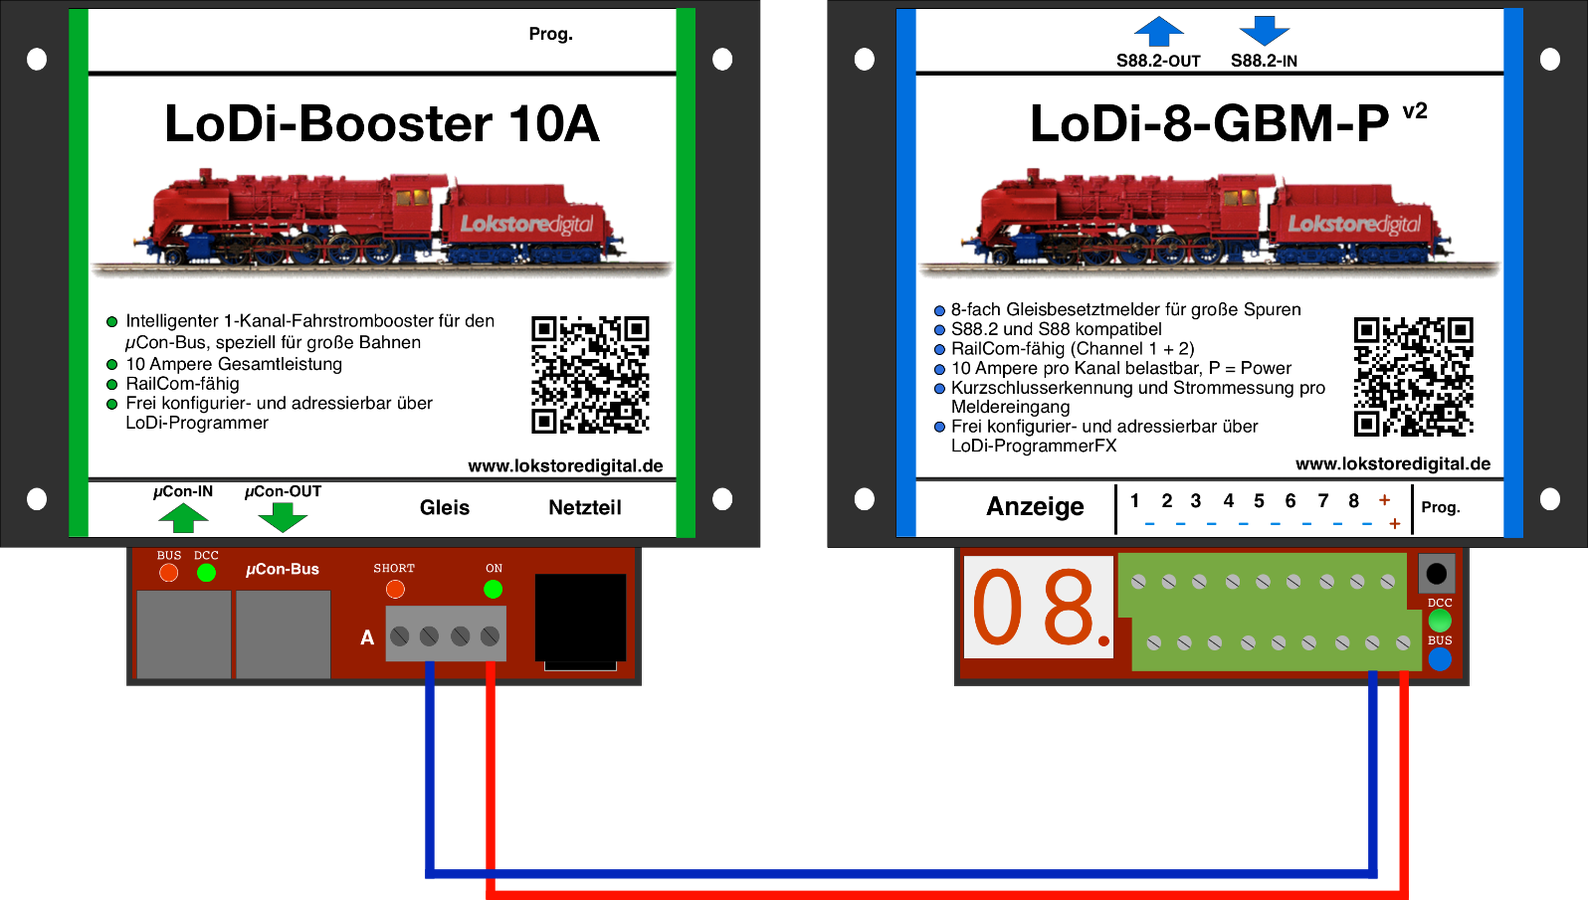
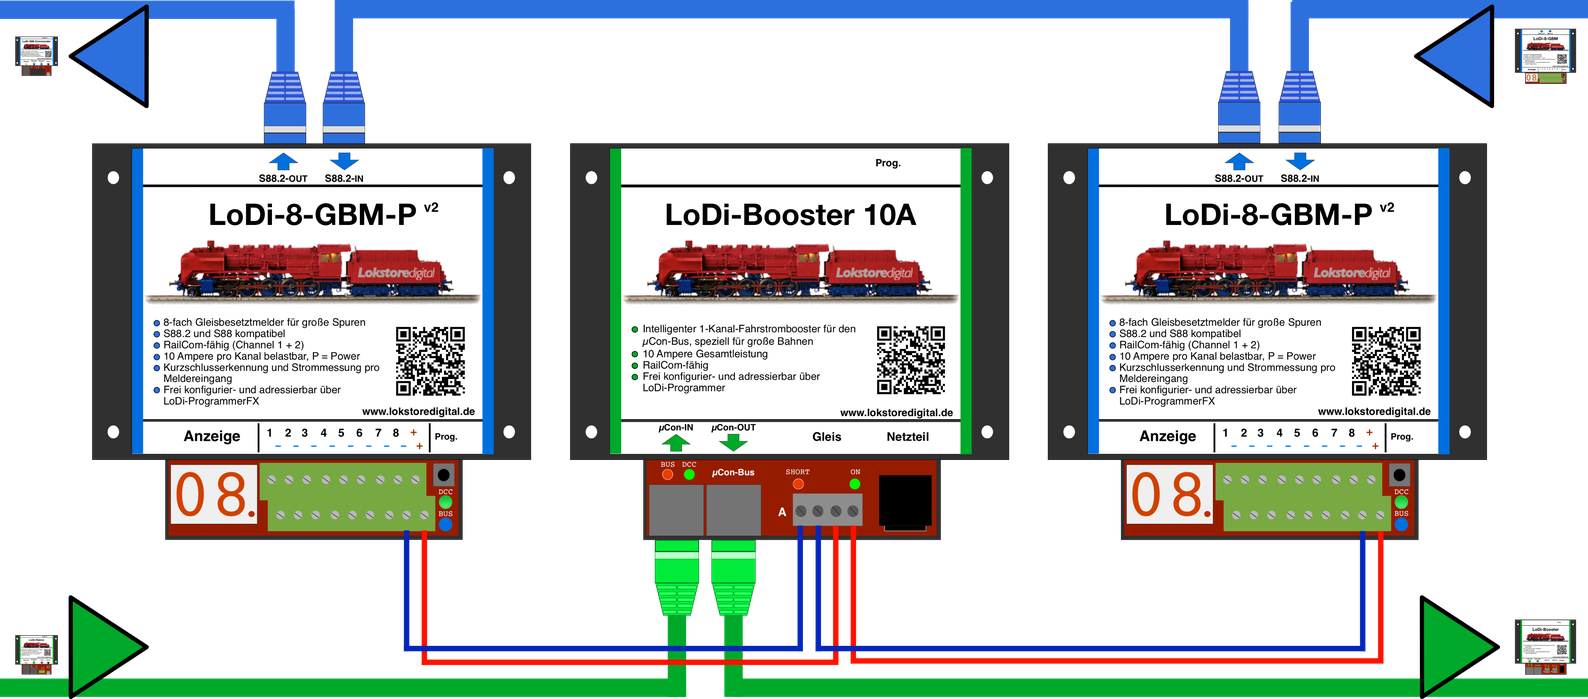
A complete view, in which the modules' buses are now shown as well.
Your wiring might look like this, for instance. You can of course also have several detection modules supplied from one booster section. It always depends on how many locomotives are to be supplied by one booster at the same time.
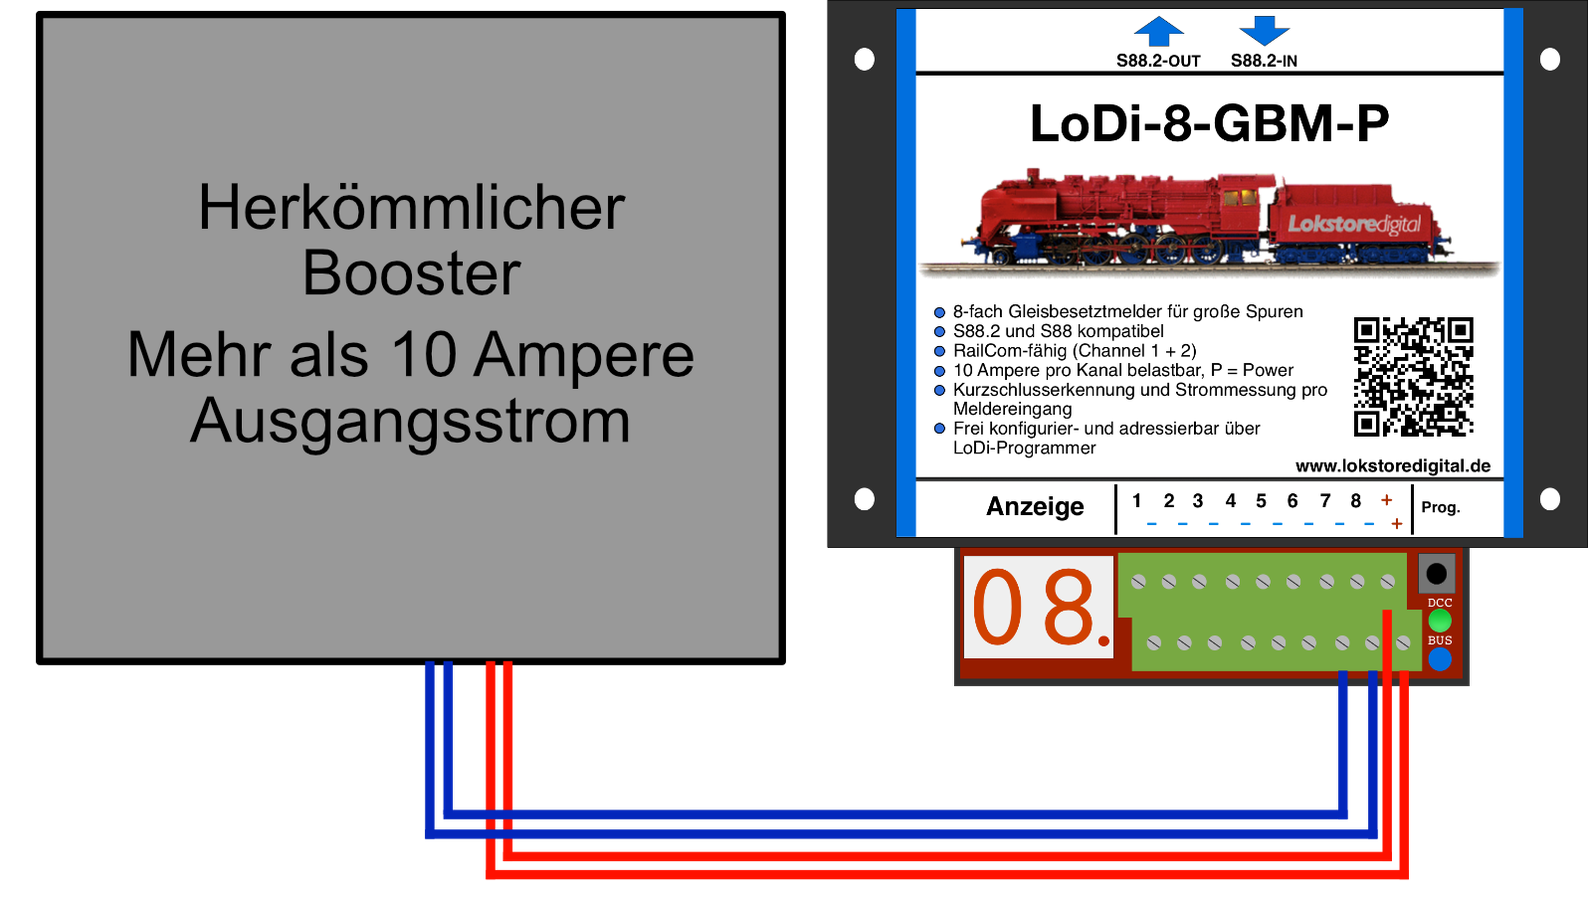
You can of course also connect boosters from other manufacturers to the LoDi-8-GBM-P v2. Some manufacturers offer boosters delivering more than 10 amperes of output current. If you have such a booster and need more current in total, we built a second + terminal into the LoDi-8-GBM-P v2.
Operation with a maximum of 20 amperes is therefore possible with the LoDi-8-GBM-P v2.
6. Connecting the LoDi-8-GBM-P v2 to the track
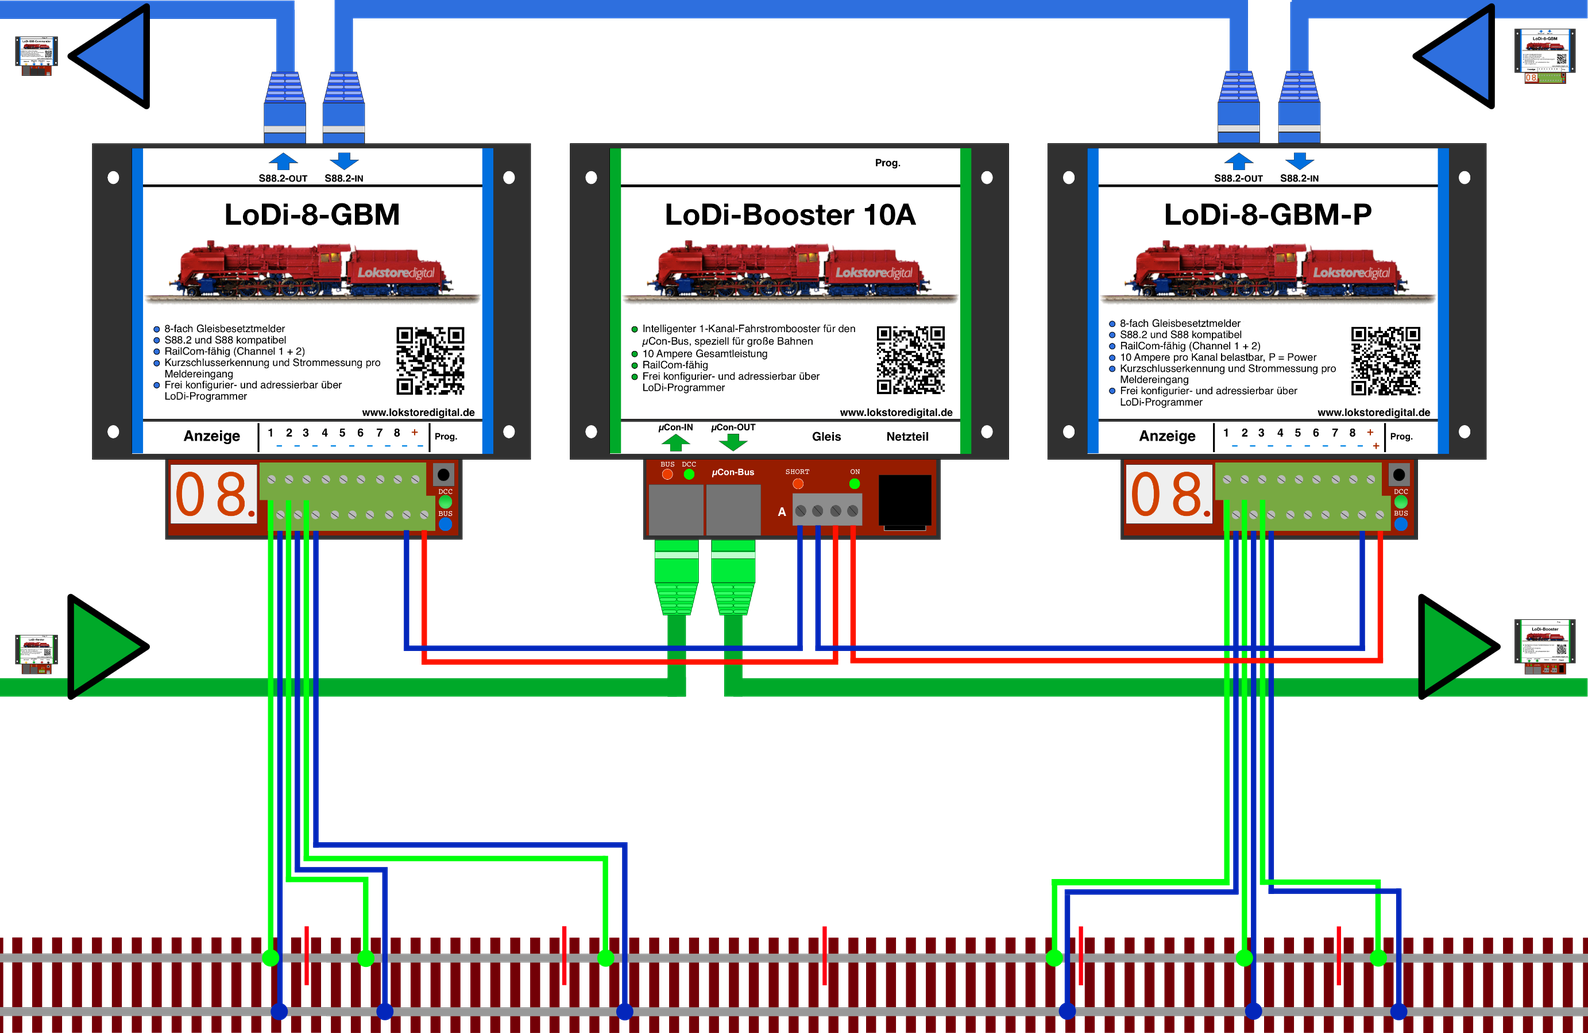
Occupancy reporting for the track is easy to arrange with the LoDi-8-GBM-P v2, always depending on how many detection sections your control software needs.
In our diagram we assume one detector per block; entry and braking detectors could of course also be needed or wanted.
The common side can be separated or joined.
If you have no idea yet about your block sections, do contact us — we will help you plan the right division.
7. Technical data
| Property | Value |
|---|---|
| Dimensions | Length 130 cm |
| Width | 115 cm |
| Height | 4.5 cm |
| Weight | 185 grams |
! ! ! Careful ! ! ! The S88.2 bus may only be run at 5 volts. Do therefore check what voltage your S88 bus runs at. ! ! ! Careful ! ! !
At the digital terminal, the "IN terminal", the detector can be supplied with 12 to 28 volts.
Do mind the specifications of your command station or booster manufacturer here.
Loadable by consumers with 10 amperes briefly and 8 amperes continuously per output. (No more than 20 amperes in total.)
Suitable for every common scale.
8. Setting up the LoDi-8-GBM-P v2 in the LoDi-ProgrammerFX
Here is how to set up the LoDi-8-GBM-P v2
9. LoDi-8-GBM-P (v2) PDF download
Here you can download a summary of the LoDi-8-GBM-P v2 and the LoDi-8-GBM-P hardware and software as a PDF.
LoDi-8-GBM-P v2