
Software
LoDi-CV-Programmer
Settings and firmware update
Like the LoDi-Booster, for instance, the LoDi-CV-Programmer converts the control signal coming from the LoDi-Rektor over the LoDi bus.
The address as delivered is 62. Would you like to change the LoDi-CV's address? Click here and go to point 1.
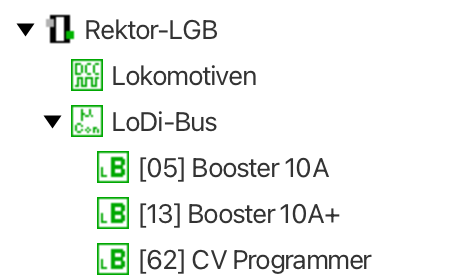
Immediately after being hooked onto the LoDi bus, the
LoDi-CV-Programmer is detected by the LoDi-ProgrammerFX.
1. Changing the LoDi-CV-Programmer's address
As delivered, the LoDi-CV-Programmer is set to address 62, as mentioned above. That can stay as it is and only has to be changed if you want to add a second LoDi-CV-Programmer to the system.
First start the LoDi-ProgrammerFX and go to the µCon bus (1); the following dialogue now opens:
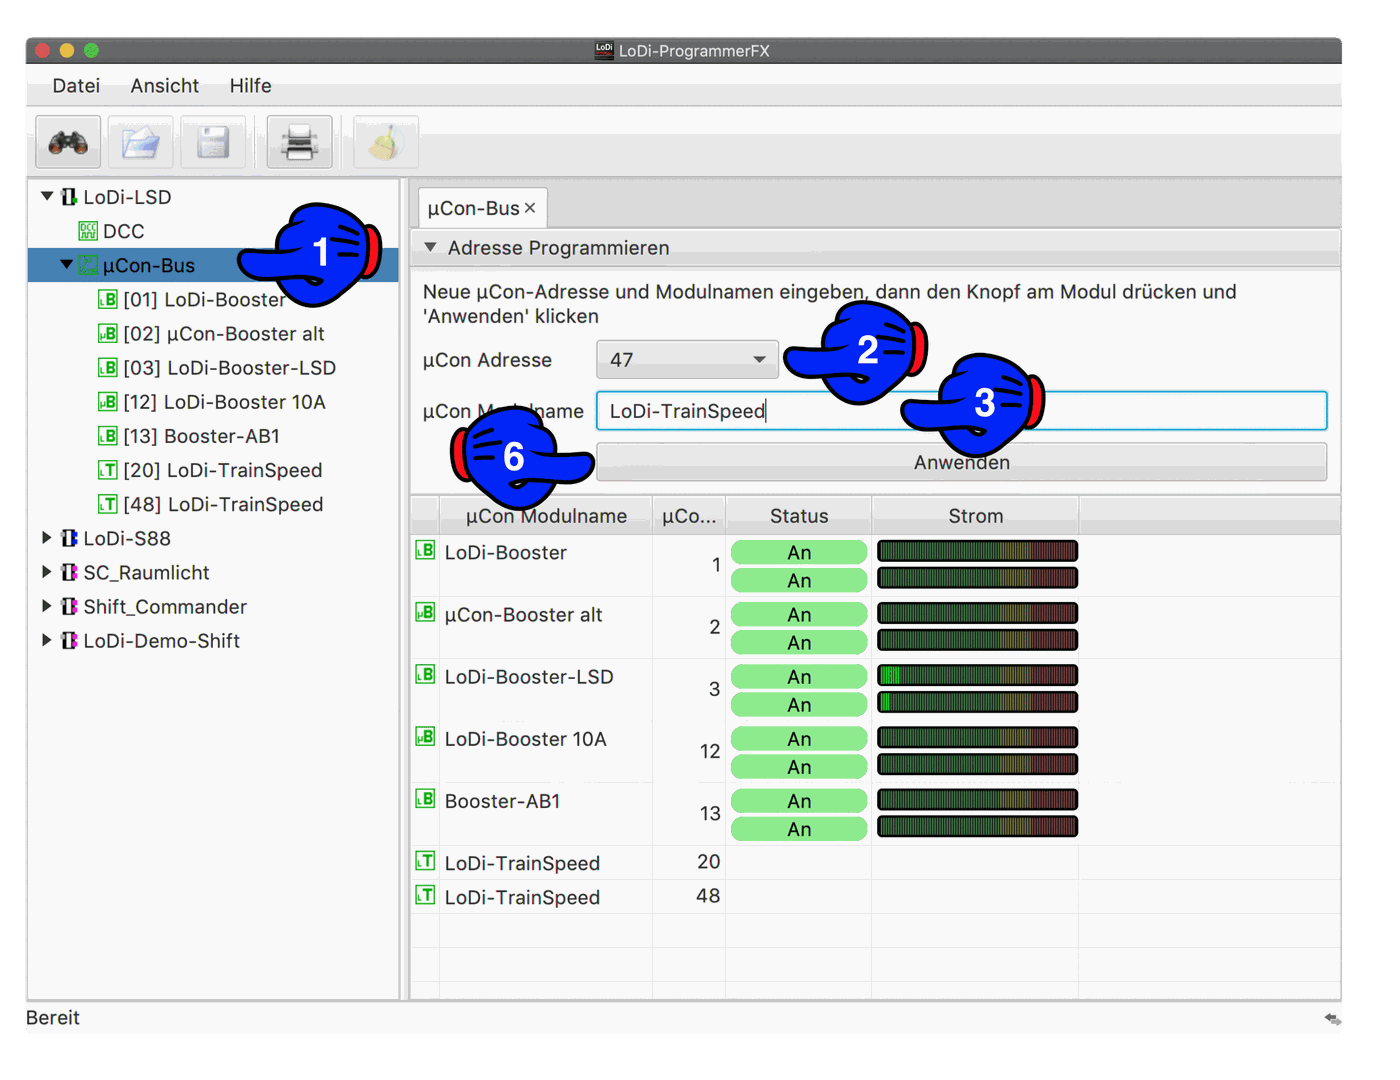
Now select the new address the device is to be given (2). A name for the device can then also be entered at (3).
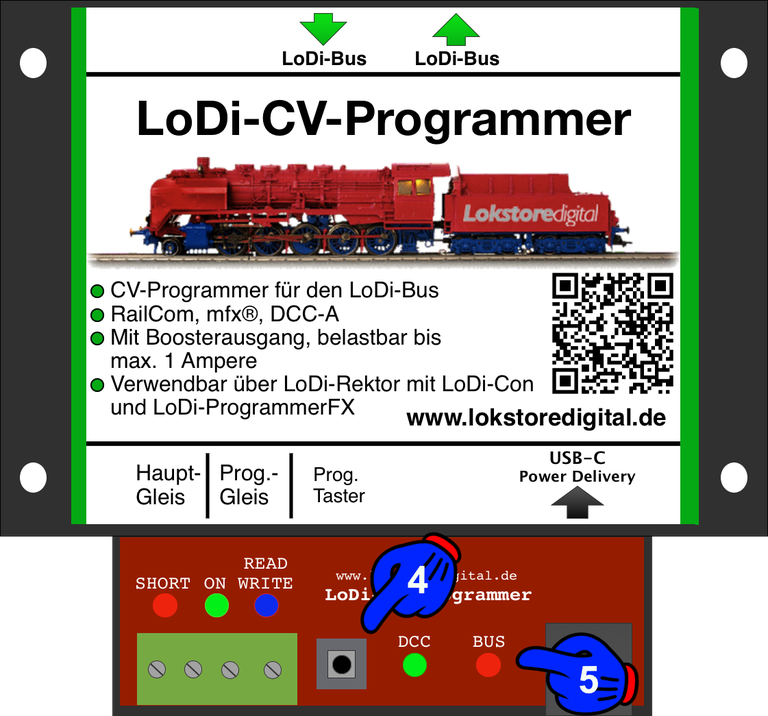
Now press button (4) on the LoDi-CV-Programmer for 3 seconds. The LoDi-CV-Programmer now jumps into addressing mode. It signals this through the two LEDs (5), which flash alternately.
Now the "Anwenden" button (6) in the LoDi-ProgrammerFX can be pressed. The CV-Programmer stops flashing immediately and has its new address set from now on.
The LoDi-CV-Programmer has now saved the new address and is shown on the bus again straight away.
2. The LoDi-CV-Programmer's settings
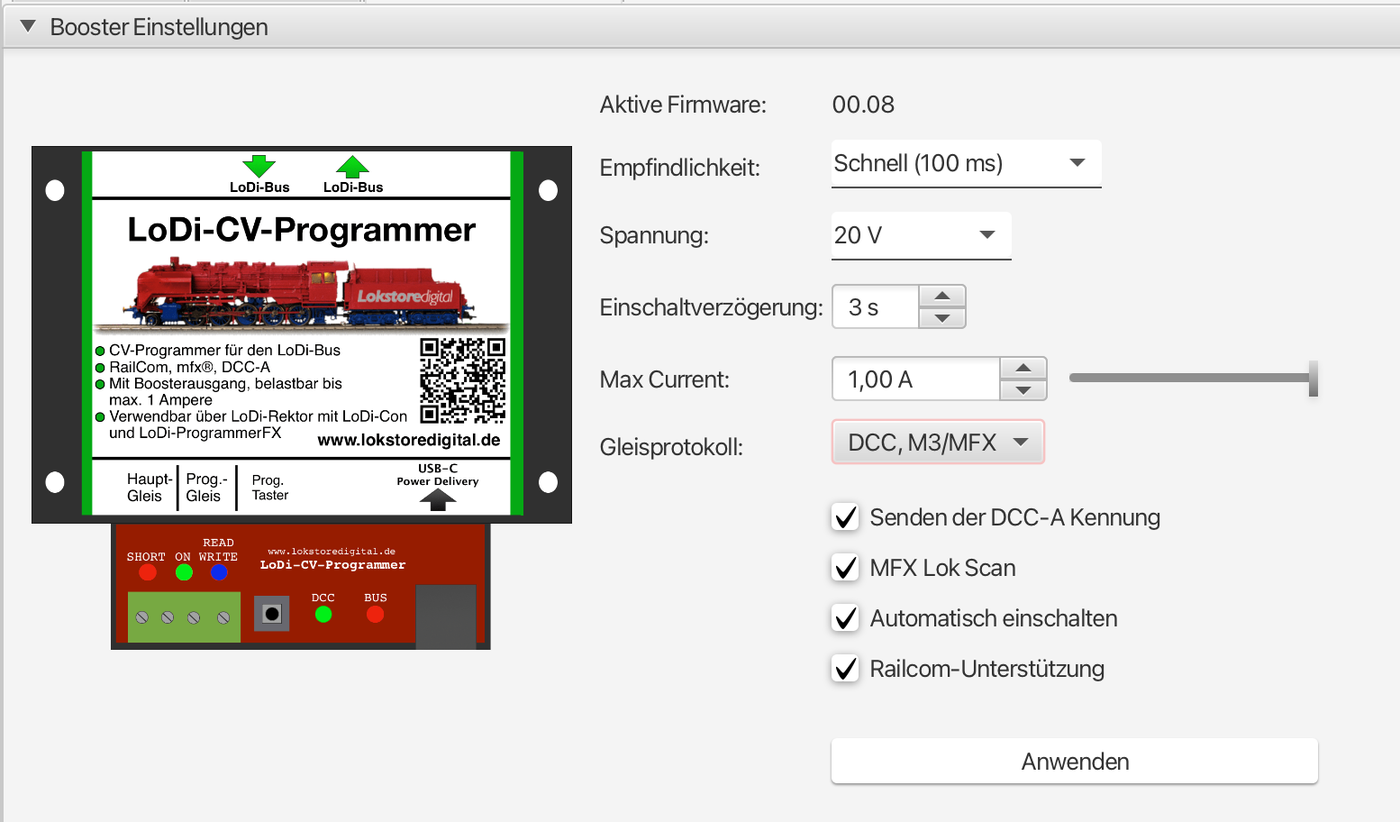
The LoDi-CV-Programmer stores its settings in internal memory.
All settings are applied and stored in the booster by pressing the "Anwenden" button.
This dialogue offers the following settings:
- Active firmware: this shows which firmware is currently installed on the device.
- Sensitivity: sets the time after which, once the short-circuit threshold is exceeded, a short circuit is detected. The actual sensitivity also depends on how often the short circuit occurs. Three-rail operators should set a higher threshold here to avoid problems when running over turnouts.
- very fast: 50 ms
- fast: 200 ms
- normal: 300 ms
- Individual short-circuit times up to 500 ms can also be entered in the sensitivity field.
- Voltage: the voltage for the USB-C PD power supply is set here. With the USB-C PD power supply supplied, the following voltages are available: 9, 12, 15 and 20 volts.
- Switch-on delay: the switch-on delay gives the waiting time before the track voltage is switched back on after a short circuit.
- Max current: here the maximum current limit can be set with a slider in 50 mA steps.
- Track protocols: here you can enable the protocols you would like to put out on the LoDi-CV-Programmer's track output.
- Sending the DCC-A identifier: support for the DCC-A standard, allowing locomotive or accessory decoders to be read out.
- mfx locomotive scan: here the automatic reading-in of an mfx locomotive can be switched on or off.
- Switch on automatically: if this option is set, the CV-Programmer automatically switches the track voltage back on after a short circuit, observing the waiting time defined in "switch-on delay". If this option is not set, the CV-Programmer's booster has to be switched back on manually, either from the software or by pressing the button on the CV-Programmer.
- RailCom support: if this option is set, the booster generates a RailCom cutout after every DCC packet. That is necessary in order to receive the data sent by the decoders in the LoDi-8-GBM feedback modules. Only set this option if you are using DCC or mfx® with RailCom.
3. Status and displays
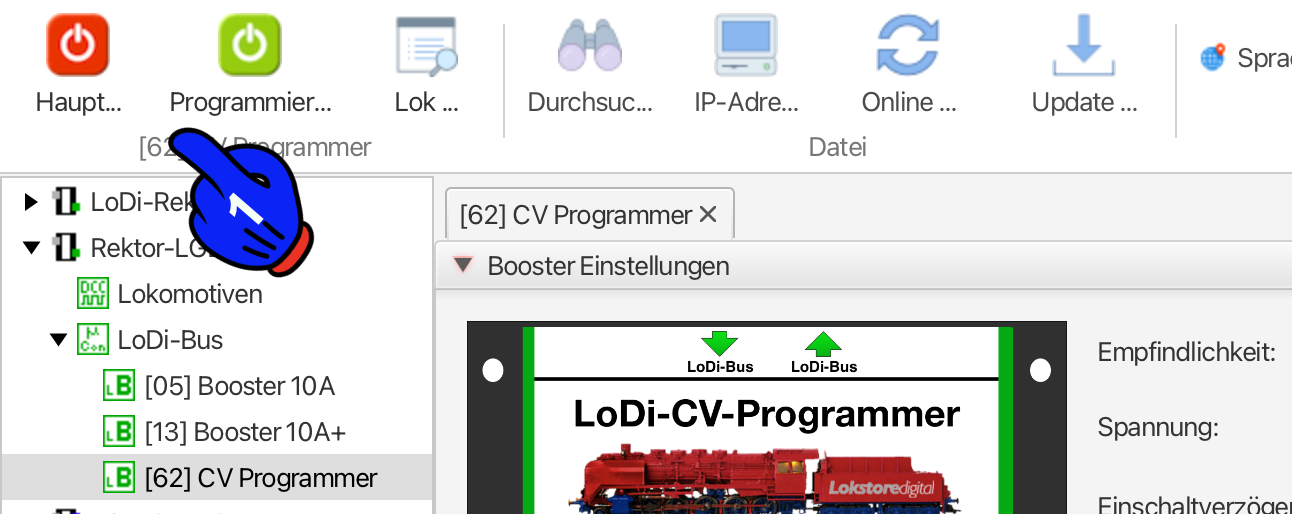
From LoDi-ProgrammerFX version 5.2025 onwards, the status of the boosters is shown directly in the status bar at the top. That does away with folding further tabs open, and the current status of active boosters is immediately visible.
- On: the channel is switched on. If a track signal is present, the track voltage is switched through.
- Off: the channel is switched off. No track voltage is present.
- Short circuit: the channel reports a short circuit. The track voltage is switched off in this state.
- Programming output active: if the output is active, the status is set to green. Only either the main track or the programming track can be active.
In further fields, which can be folded open or closed at the bottom of the LoDi-ProgrammerFX, the LoDi-CV-Programmer can show current, voltage, temperature, locomotive search and the firmware version.
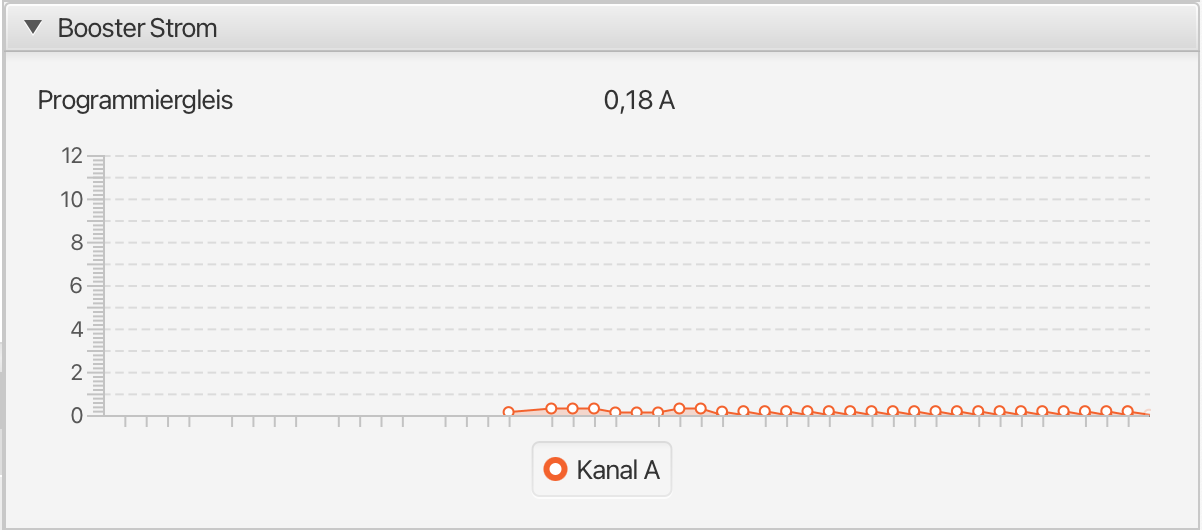
This area shows the current draw of the main track or the programming track, depending on which of the two outputs is currently active.
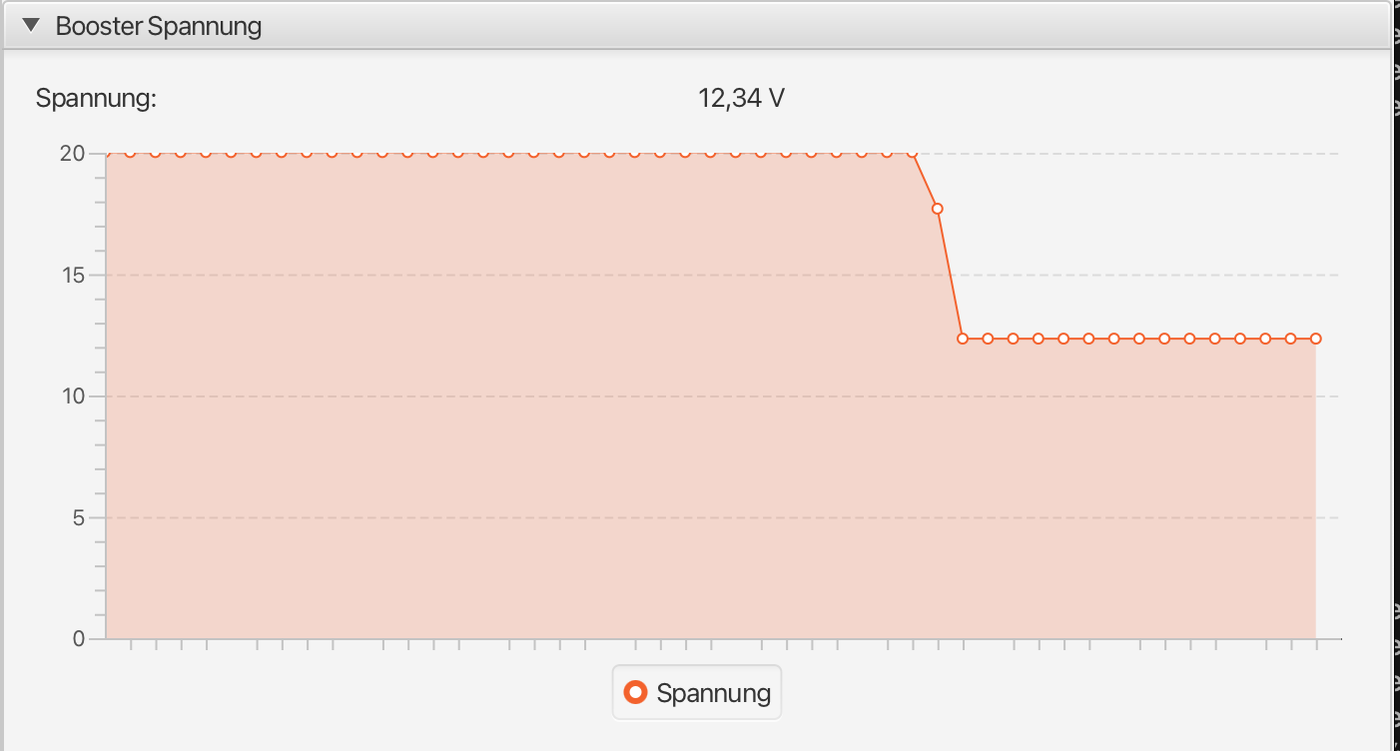
This area shows the voltage present on the track.
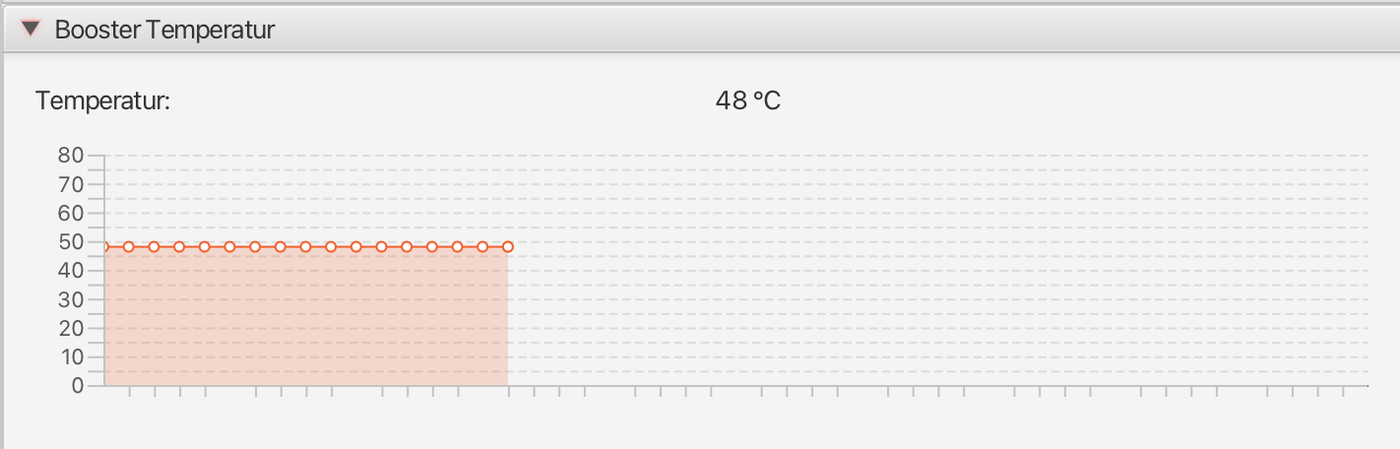
This area shows the temperature of the booster over time, measured directly at the output stage. The LoDi-CV-Programmer has no fan, so the temperature here can reach up to 95 degrees; should the temperature rise above 95 degrees, the CV-Programmer's output stage is switched off.
4. Searching for a locomotive in the LoDi-ProgrammerFX
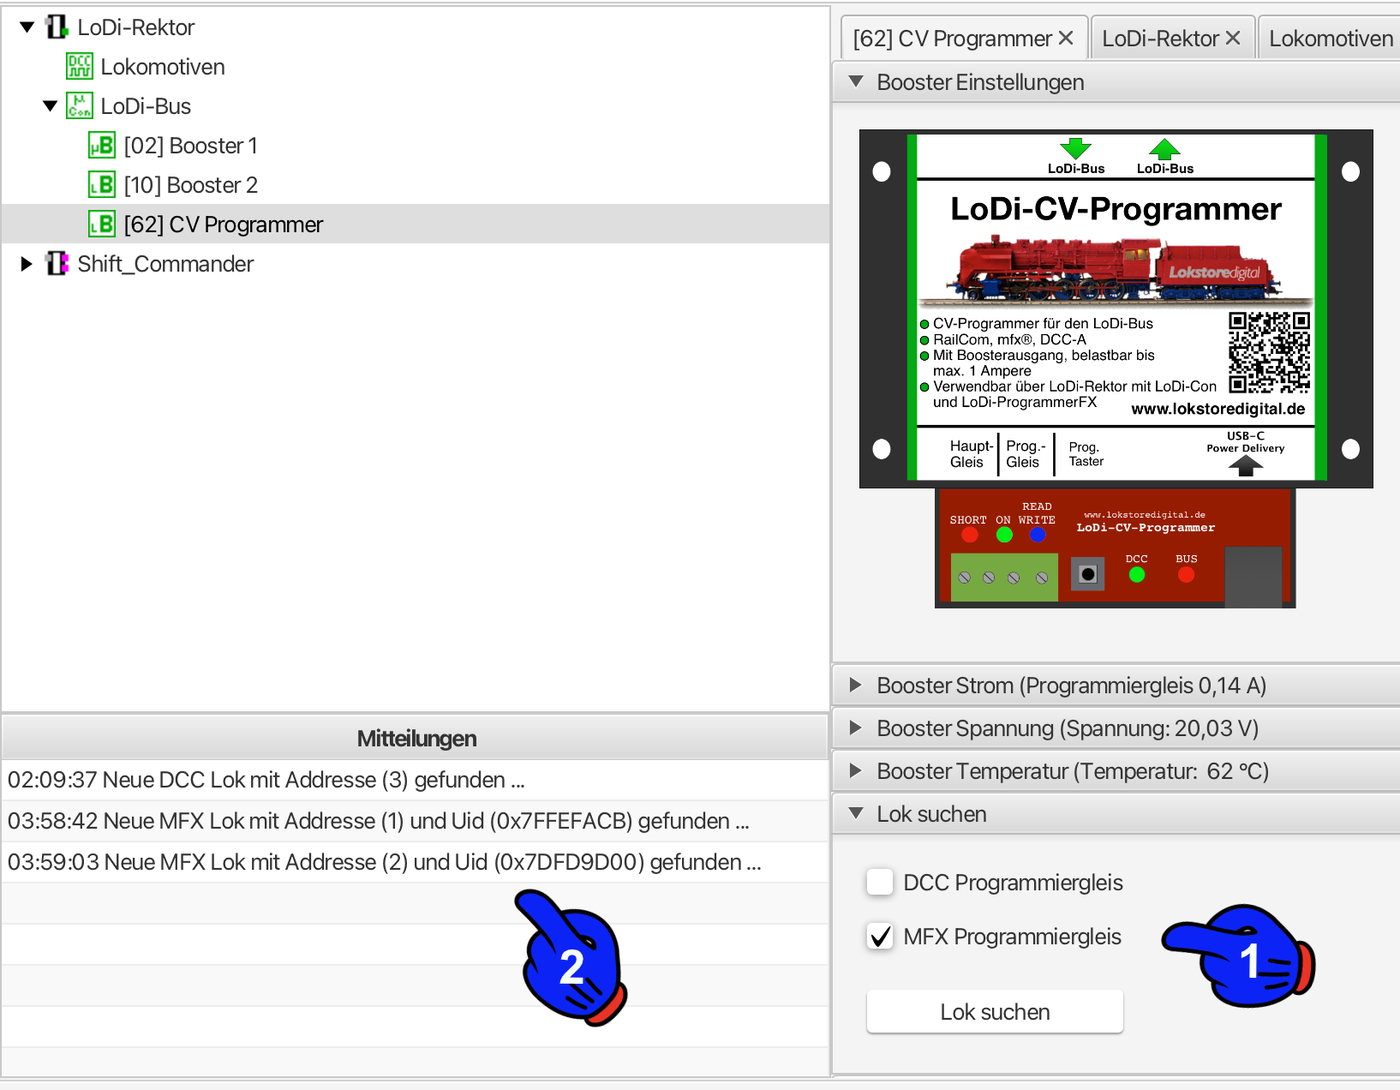
The new "Lok suchen" tab (1) in the LoDi-ProgrammerFX lets you identify the locomotive on the programming track quickly and easily. Simply choose whether you want to scan a DCC or an mfx locomotive. On DCC locomotives, CV values 1 or 17/18 are read out in order to determine the address quickly. Please make sure the locomotive is on the programming track so the scan runs smoothly.
The results of the scan are then shown in the new message window (2) at the bottom left, so you have all the relevant information in view straight away.
About the UID of an mfx locomotive: when reading out an mfx locomotive you determine its unique UID. Note it down if need be, since it serves as a one-off identifier and can be used directly for all further settings. With the UID you have captured, you can enter and control your mfx locomotives in software such as iTrain, Win-Digipet or Stellwerk immediately.
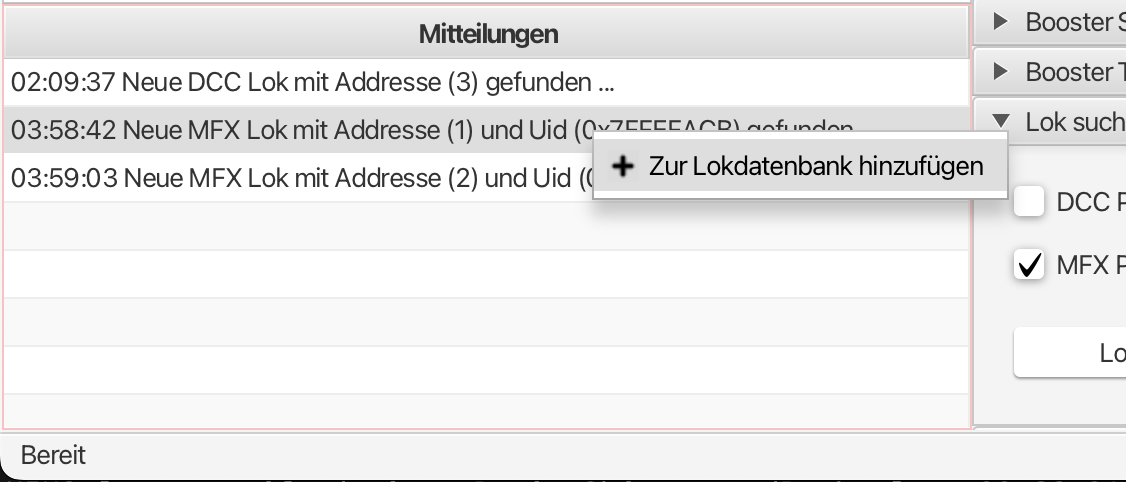
To be able to control a locomotive now, it first has to be added to the database under the LoDi-Rektor in the "Lokomotiven" tab. You do that by right-clicking, in the LoDi-CV-Programmer's message window, the locomotive that has been read in and is to be entered in the database, and then pressing "Zu Lokdatenbank hinzufügen".
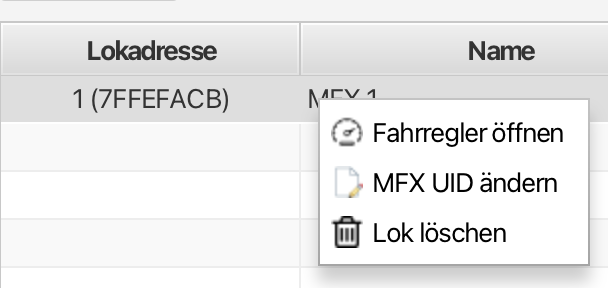
Once the locomotive has been entered in the database, you can right-click the locomotive you added and open the throttle directly to drive it.
5. Updating the LoDi-CV-Programmer's firmware
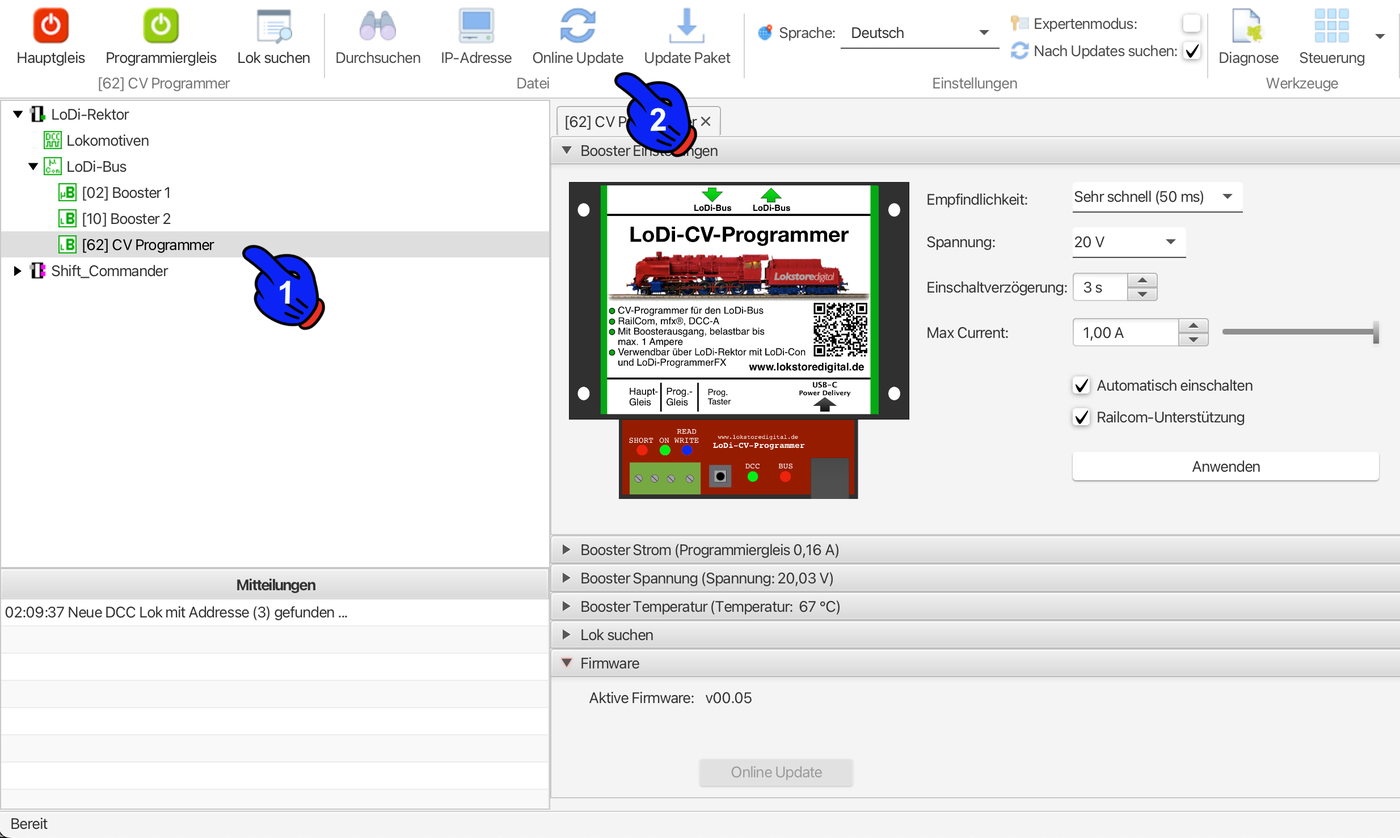
Like every other device on the LoDi bus, the LoDi-CV-Programmer can be updated through the LoDi-ProgrammerFX or the LoDi-Con. To update the CV-Programmer through the LoDi-ProgrammerFX, proceed as follows: first click the CV-Programmer (1) in the LoDi-ProgrammerFX's tree. At the bottom right you will now find the Firmware tab. There you see the firmware currently installed (FW 00.05, for instance).
Click "Online Update" to search for available updates. A dialogue opens which checks on the online server whether a new version is available. That dialogue also lets you install older versions if need be.
Then select the newest version shown, or the previous version (3) if available, and click Install update (4). In the next dialogue the currently installed version and the version to be installed are shown to you once more.
Unlike the other LoDi bus devices, the LoDi-CV-Programmer does not have to be put into the bootloader by hand; that happens automatically here as soon as a firmware version is selected and installed.
The LoDi-CV-Programmer reboots once after the update and then reports back on the LoDi bus as usual straight away. A quick check shows that the current firmware is now installed.
6. CV programming with the LoDi-ProgrammerFX
CV programming over PoM with the LoDi-ProgrammerFX has been a fixed part of our software from the start.
Our own accessory decoders have been settable with it ever since as well.
To reach the programming dialogue, click "Steuerung" > "Programmieren" at the top of the ProgrammerFX and select your command station there, that is the "LoDi-Rektor".
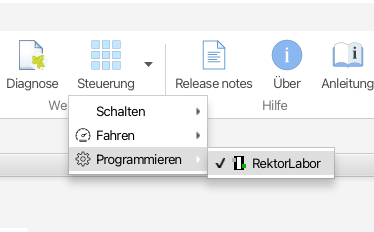
The programming dialogue now opens, in which you can enter and change the CVs you want.
On the left you see a booster symbol which gives you the option of switching boosters on and off.
Then you select whether you want to use the main track or the programming track.
To edit a locomotive, set the type to locomotive.
The DCC address is greyed out, since we want to change the locomotive specifically through the programming track.
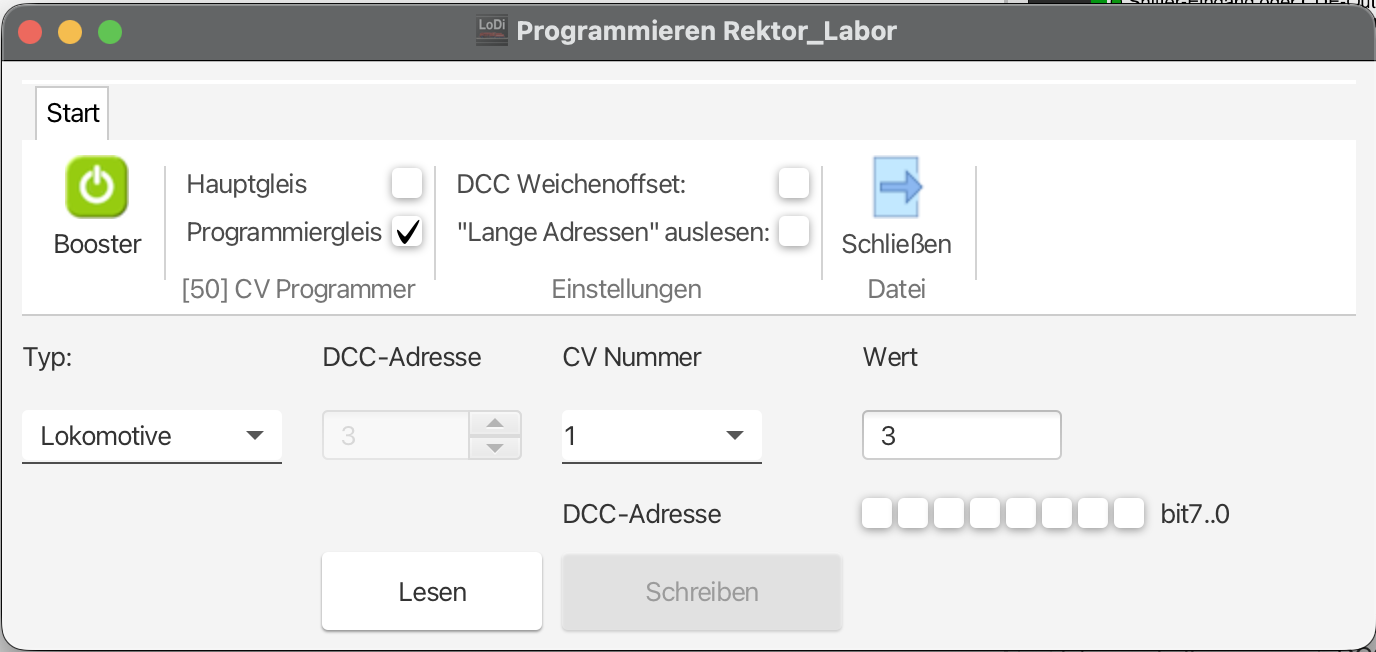
Clicking "Lesen" shows the current value in the "Wert" field.
In that field you can now also enter a new value and then transfer it straight to the locomotive decoder through the programming track with "Schreiben".
Setting Märklin locomotive decoders in DCC: for most DCC users, programming CVs has long been part of everyday life. For Märklin operators, by contrast, this approach is often still new. Using a practical example, we would therefore like to show you step by step how to switch a Märklin locomotive with an mSD or mLD decoder from generation 2 onwards to DCC — by setting the locomotive address to 700, for instance.
The goal: the locomotive should run at DCC address 700 in future and be prepared for PC operation (iTrain, Win-Digipet and others).
First compatibility has to be checked, since not every Märklin decoder can be configured over DCC. Here is a short note on the various decoder generations: mfx decoders from about 2004–2012 (before mLD/mSD) as well as mLD/mSD Gen1 from about 2012–2015 can only be programmed over mfx.
We will make the basic parameters settable for those as well; as of 10/2025, however, that is not yet possible — work is already under way and it should be possible shortly; more on that further down.
On the mLD/mSD Gen2 to Gen3 (current), DCC is possible. On TRIX, RailCom is usually available as well.
Now place the locomotive on the programming track on its own. CVs can be written or read directly with the LoDi-ProgrammerFX, the LoDi-Con or model railway software such as iTrain or Win-Digipet.
We now start with step 1, switching the locomotive to DCC. Normally the decoders are open to all protocols; where possible we will run the locomotives in DCC. The mfx protocol can of course still be used, but our recommendation is DCC.
The protocols are set in CV50. Please read this CV out first before changing it. It is not always the same and should be noted down if need be. We now write CV50 = 0 → DCC protocol only. That applies to mLD/mSD Gen2/Gen3; if the CV differs or does not exist, please check the decoder's manual.
In step 2 we reduce the braking and acceleration times for PC control: CV3 (acceleration) = 1, CV4 (braking) = 1.
That way the model railway software takes over the acceleration and braking ramps.
In step 3 the long address 700 is now written. You can work the addresses out below with our CV calculator; in our example, 700 gives CV17 = 194 and CV18 = 188. These two values are now also entered through the programming track. Once both values are written, we still have to adjust CV29 and enable the long address there. For that, enter 34 in CV29 on Märklin locomotives and 42 on TRIX locomotives with a RailCom-capable decoder.
To sum up which CV values we have now entered or changed one after another: CV50 = 0
CV3 = 1
CV4 = 1
CV 17 = 194
CV 18 = 188
CV 29 = 34
Not sure which value has to be set in CV29? Use our CV calculator.
Setting Märklin locomotive decoders in mfx: this function is in progress . . .
7. CV calculator
This CV calculator helps you set decoder parameters quickly and reliably. Enter the locomotive address you want and have CV17 and CV18 calculated automatically — or read existing CV values back the other way. Beyond that, a few clicks let you set the RailCom channels (CV28) and the basic decoder options (CV29).
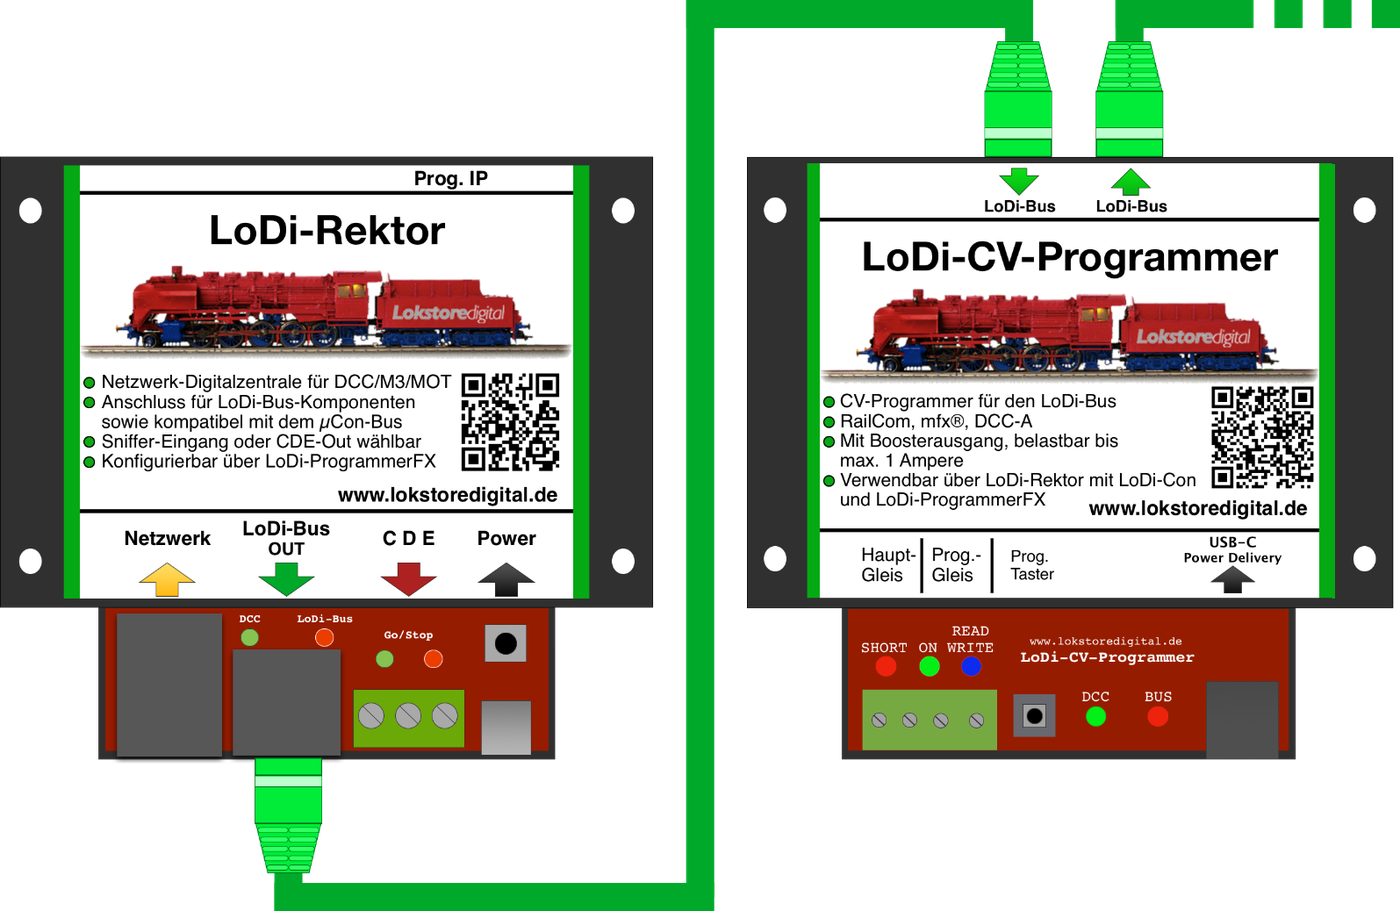
8. Connecting and setting up the LoDi-CV-Programmer
Click here to reach the LoDi-CV-Programmer hardware description.

Any questions still open?
Would you simply like to ask us in person?
Or go to our forum, where experienced users are glad to help you further.