
Software
LoDi-Light-Operator 4-C-LED
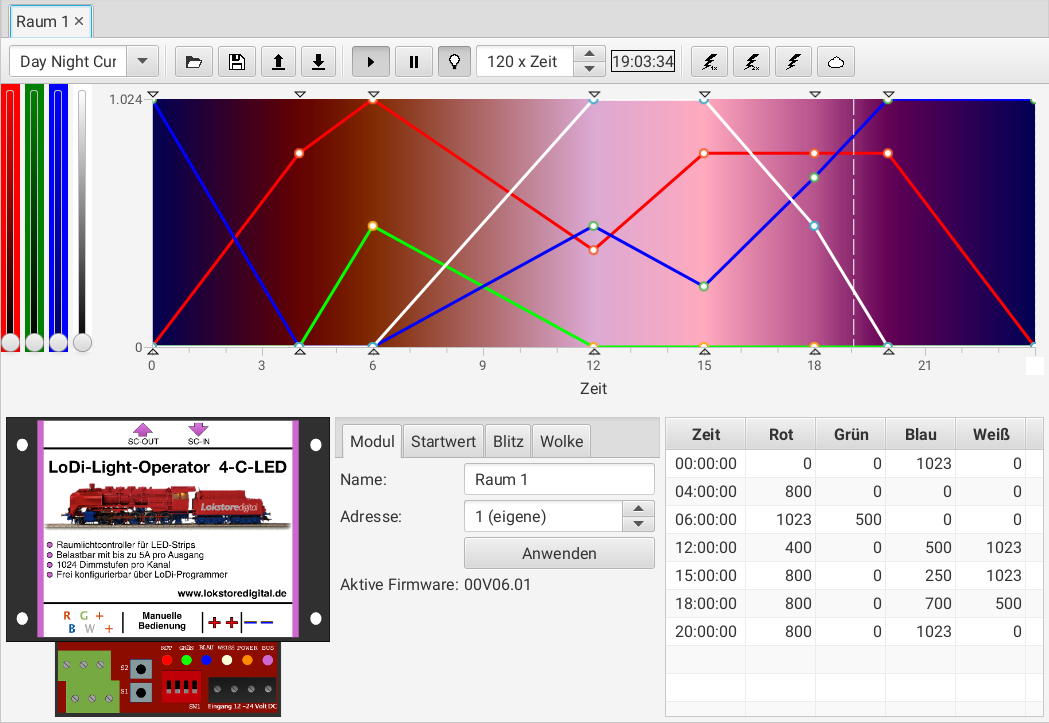
The LoDi-Light-Operator 4-C-LED serves to control the room lighting. Three 24-hour light curves as well as various additional effects can be configured.
When the editor is opened for the first time, all the settings are loaded from the device. That can take a few seconds. So you can follow it more easily, the progress of the loading operation is shown at the bottom of the LoDi-ProgrammerFX's status line.
The layout of the dialogue
The configuration dialogue consists essentially of five parts:
- the toolbar (top)
- sliders for red, green, blue and white (top left)
- the 24-hour light curve display (top right)
- settings for the module and the effects (bottom centre)
- a table of all the light curve's control points (bottom right)
The toolbar

The toolbar gives access to important functions of the LoDi-Light-Operator. The functions are explained below from left to right:
- Curve selection: here one of three 24-hour light curves can be selected. The curves are always shown in the order in which they are stored. Curve 1 is therefore always at the top, curve 2 in the middle and curve 3 is the last entry in the list. In the model railway control software the curves can be driven through states (aspects) 1–3. The curve's name is edited in the text field of the selection box. The entry is applied by pressing the Return or Enter key at the end.
- Import a curve from a file: loads a curve from the hard disk into the editing area. The curve is loaded with all its control points and the curve name.
- Export a curve to a file: saves a curve from the editing area to the hard disk. The curve is saved with all its control points and the curve name.
- Load the curve from the device: loads the active curve from the device.
- Write the curve to the device: stores the active curve on the device.
- Start: starts the active curve on the device. If an edited curve has not yet been transferred back to the device, the actual light curve can differ from the display in the dialogue. Time runs at the speed set previously.
- Pause: stops the time on the device.
- Light on/off: switches the LoDi-Light-Operator's outputs on or off.
- Time factor: sets the speed of the clock. The time factor can be set in the range between 1× and 250×. Note that there is only one clock in the LoDi-Shift-Commander, which applies to all connected LoDi-Light-Operators.
- Simulated time: this is the LoDi-Shift-Commander's current simulated time. It is only shown in the toolbar and cannot be changed there.
- Lightning effect: triggers a simple lightning effect. In the model railway control software this effect sits on state (aspect) 8.
- Double lightning effect: triggers a double flash, where the second flash is somewhat weaker than the first. In the model railway control software this effect sits on state (aspect) 9.
- Random lightning effect: triggers flashes at random over a period of time. This effect can be changed in the effect settings (bottom centre). In the model railway control software this effect sits on state (aspect) 10.
- Cloud effect: darkens the light to a certain degree and for a certain time. This effect only makes sense when several LoDi-Light-Operators are used and coordinated in time. The duration and intensity of this effect can be changed in the effect settings (bottom centre). In the model railway control software this effect sits on state (aspect) 11.
All effects are played in addition to any light curve already running and are overlaid on it.
The colour sliders
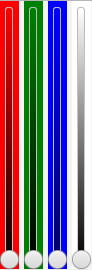
The colour sliders let you set the four channels red, green, blue and white directly. The value set is put out on the LoDi-Light-Operator's outputs straight away, so you can judge the light while setting it.
If an entry in the light curve is selected, it is changed by the sliders as well.
These sliders are also used to set the LoDi-Light-Operator's starting value, which is adopted automatically when the layout is switched on. The corresponding settings area is at the bottom centre.
The light curve display
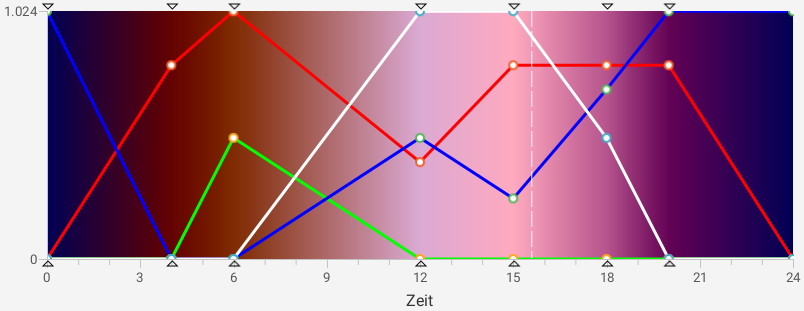
The light curve display combines many functions. On the one hand it serves to edit the light curve, on the other the current simulated time can be changed here.
The light curve covers a full 24-hour day. The time axis runs from left to right between 0 and 24 hours.
The individual colour channels red, green, blue and white are shown as curves in their colours. A value is defined for every colour at every control point. Between the control points the colour channels are interpolated linearly.
When the simulated time is stopped, the control points can be moved along the time axis with the mouse.
The 0:00 control point is always present and cannot be moved. Its colour values are identical to those at 24:00.
A control point can be selected with the mouse and the individual colour channels changed with the colour sliders on the left-hand side.
The background of the light curve display shows the approximate result. It will not match the light produced by the hardware. So check the light yourself on site.
Please note that all changes only take effect after being downloaded to the device. Use the "Schreibe Kurve auf das Gerät" button in the toolbar for that.
The current simulated time is shown as a dashed line (seen at about 15:30 in the picture above). This line can be grabbed with the mouse and moved. The new simulated time is transferred to the LoDi-Shift-Commander when the mouse button is released and is active immediately.
The control point table
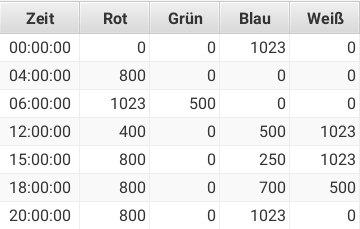
The control point table is at the bottom right of the dialogue. It shows all the control points of the 24-hour light curve, sorted chronologically. The individual colour values of the light channels can be edited. The permitted range is between 0 and 1024 (10 bit).
Please note that all changes only take effect after being downloaded to the device. Use the "Schreibe Kurve auf das Gerät" button in the toolbar for that.
Settings
Every LoDi-Light-Operator has the following settings dialogues:
- Module: module name and address
- Starting value: defines the colour slider settings that become active immediately after the layout is switched on.
- Lightning: settings for the random lightning effect
- Cloud: settings for the cloud effect
Module
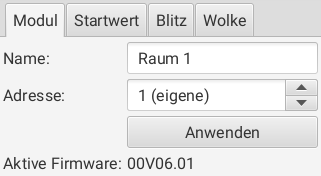
The settings for the LoDi-Light-Operator module comprise the module name and the address. These settings are transferred to the device by clicking the "Anwenden" button.
The module name may be 8 characters long.
In the address field, apart from the address currently active in the module, only free addresses are shown. The address matters for driving it from the model railway control software.
In the lower area the firmware active in the LoDi-Light-Operator is shown for information.
Starting value
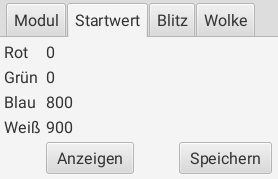
The starting value sets the colour settings that become active immediately after the LoDi-Light-Operator is switched on. That way you have light in the room right away, without having to start the model railway control software first.
The values set for red, green, blue and white are shown channel by channel in the upper area. The range is between 0 and 1023. 0 means off and 1023 full brightness.
Pressing the "Anzeigen" button transfers the values set to the colour sliders as well as to the LoDi-Light-Operator's outputs. They can now be changed with the colour sliders.
The new starting values are saved on the LoDi-Light-Operator by pressing the "Speichern" button and are set automatically the next time it is switched on.
Lightning
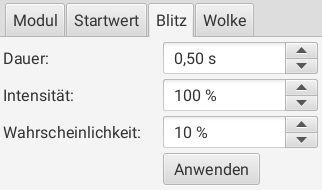
The lightning setting changes the parameters for the random lightning effect, which can be selected through state (aspect) 10 in the model railway control software.
This effect is suited to simulating a thunderstorm. It works particularly well when the lightning is combined with thunder sounds played at the same time.
The following values can be changed:
- Duration: defines the period over which the storm is to be active.
- Intensity: defines the strength (brightness) of the flashes. The white and blue channels are always overlaid here.
- Probability: sets the percentage probability of lightning.
All settings are applied to the LoDi-Light-Operator and saved by pressing the "Anwenden" button.
Cloud
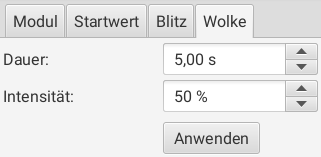
The cloud setting changes the parameters for the cloud effect, which can be selected through state (aspect) 11 in the model railway control software.
With this effect the light level of all channels is reduced within one second by the value defined in Intensity and held for the duration of the effect.
After the effect ends, the original brightness is restored within one second
This effect is suited to simulating passing clouds. That of course only works if several LoDi-Light-Operators are driven in a time-coordinated way by the model railway control software.
The following values can be changed:
- Duration: defines the period over which the darkening is to be active.
- Intensity: defines the strength of the darkening. All colour channels are darkened by the corresponding percentage. So take care the cloud does not turn into a solar eclipse.
All settings are applied to the LoDi-Light-Operator and saved by pressing the "Anwenden" button.

Any questions still open?
Would you simply like to ask us in person?
Or go to our forum, where experienced users are glad to help you further.