
Hardware
LoDi-Shift-Commander
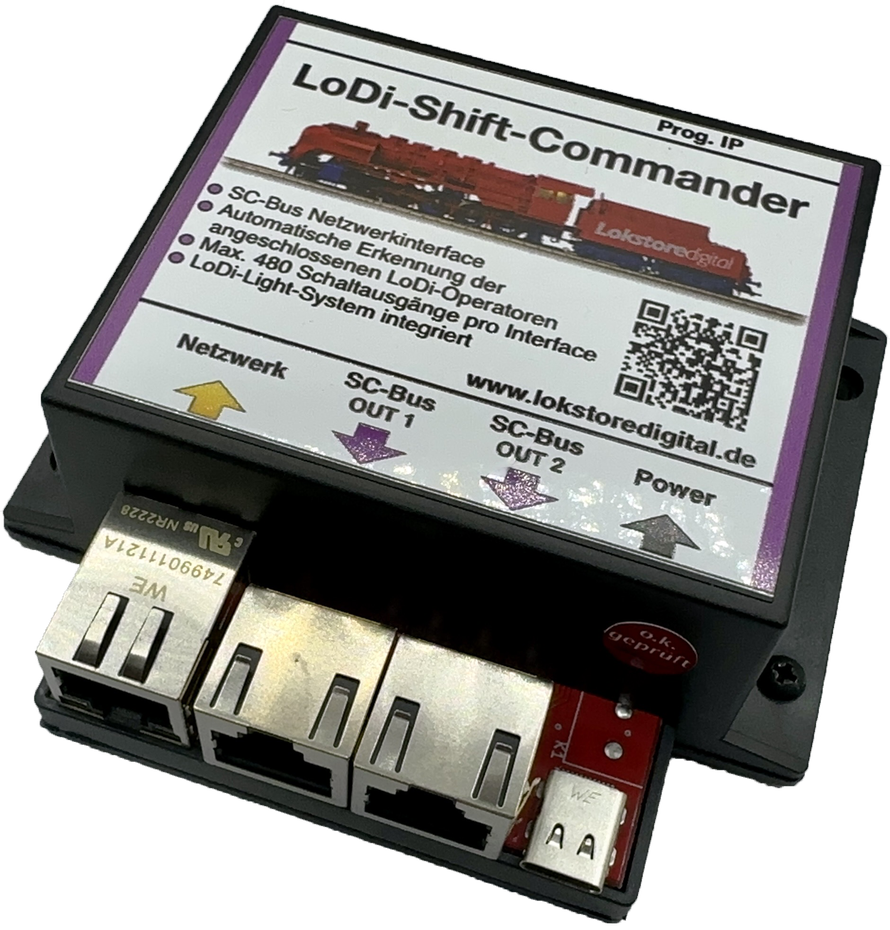
The LoDi-Shift-Commander — the network interface for the SC switching bus, built for reliability and speed.
Thanks to the separated switching system, the LoDi-Shift-Commander could throw up to 253 turnouts at the same time, provided enough transformer power is available. But it is not only the speed that convinces our customers again and again. The high reliability of the LoDi-Shift-Commander is another factor that makes this switching interface the first choice for dependable layouts with solenoid accessories, motor turnouts, lighting and room lighting control.
So if you are planning a dependable layout with solenoid accessories or motor turnouts, do take a look at the LoDi-Shift-Commander and its LoDi-Operators. With them you can control your layout reliably and precisely!
Features of the LoDi-Shift-Commander
- It forms the link between the computer and the accessory decoders, the LoDi-Operators, as well as the room lighting control. It is therefore an interface for every switching task around the layout or the car system.
- If you are looking for a device for switching tasks on your layout, the LoDi-Shift-Commander is the right choice.
- Purple patch cables are used to wire the devices. Every module attached to the LoDi-Shift-Commander is also marked with purple side stripes, purple arrows and even purple LEDs, so that even in the dark under the layout you can see at once which device belongs where.
- Automatic bus detection is built into the LoDi-Shift-Commander. When you add a new module to the bus, you can assign it freely straight away and configure it in the LoDi-ProgrammerFX.
- A total of 480 switching outputs is provided per LoDi-Shift-Commander.
- A modern room lighting control with time control is built into the LoDi-Shift-Commander.
- A modern network interface, and therefore driver-free operation!
1. The LoDi-Shift-Commander and its connections
The LoDi-Shift-Commander is the interface for every switching task on your layout.
Whether lights, signals or turnouts, the LoDi-Shift-Commander handles every task with ease and is effortless to configure.
No more tiresome CV programming is needed; through our programming tool, the LoDi-ProgrammerFX, you can set every device simply and easily. More on that in our videos.
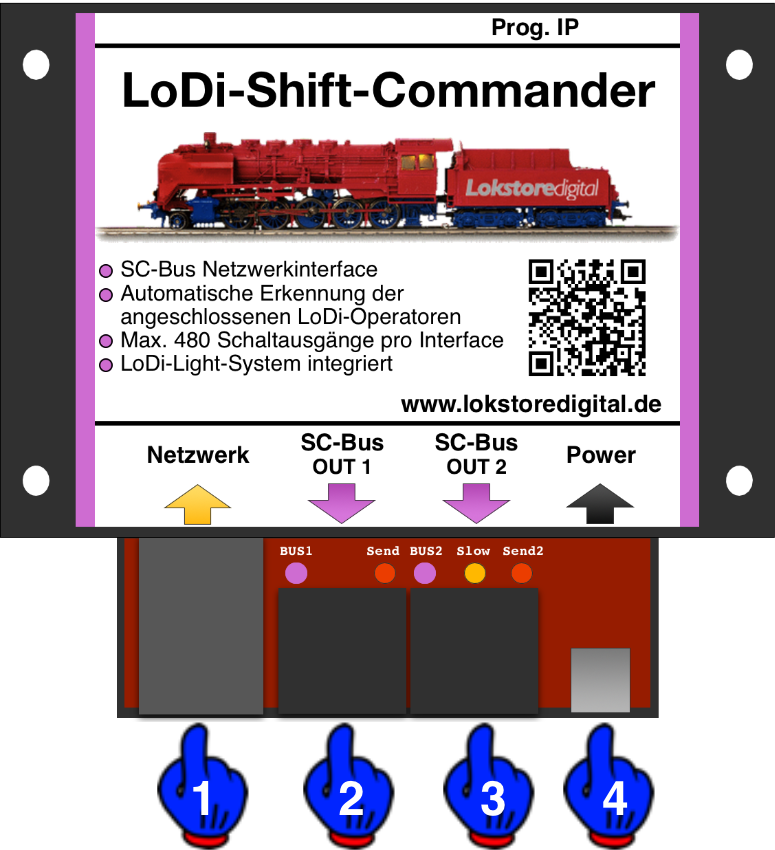
About the connections on the
LoDi-Shift-Commander:
- (1) Network port: connect your network switch or router to the device here.
- (2) SC bus Out 1: this bus is treated as the fast lighting bus. That means every module connected to it is able to dim consumers through its outputs. 96 outputs are available in total here.
- (3) SC bus Out 2: this bus can also provide 96 dimmable outputs; if you switch the bus over to Switch, 384 channels are available. As a rule you would connect your turnouts here, along with room lighting decoders or stepper motor decoders.
- (4) USB-C port: no need to worry, no USB is connected to the PC here — as mentioned above we work only with driver-free interfaces. The USB-C connection serves solely as the 5 volt supply for the LoDi-Shift-Commander.
2. LEDs and button on the LoDi-Shift-Commander
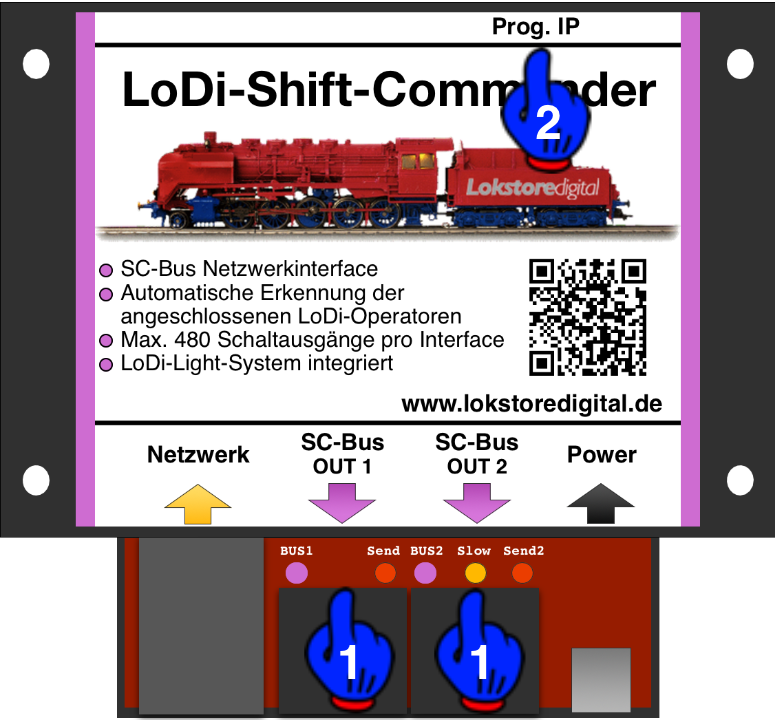
The LoDi-Shift-Commander has several LEDs and a button to help you read the state of the device and understand faults more quickly.
- (1,2): the two purple LEDs and the orange LED show you the state of the bus. When it is switched active, the purple one lights on the left at bus 1. The second bus can act as a fast or a slow bus, which you can configure in the
- LoDi-ProgrammerFX. If you have the bus set to slow, the orange LED lights; as a fast bus the purple one lights at bus 2
- (2) Prog. IP button and LED: this button is used whenever you want to change the IP address of your LoDi-Rektor. More on that in the LoDi-ProgrammerFX description
3. Connecting power
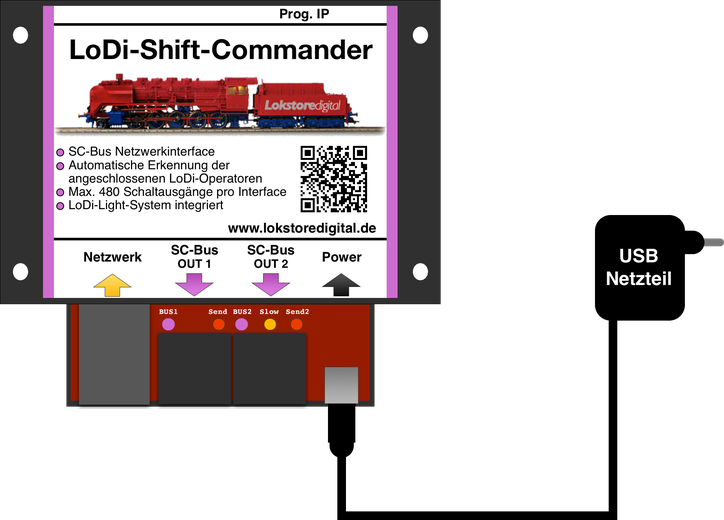
We deliver the LoDi-S88-Commander LX with a high-quality USB power supply. You are of course welcome to use your own USB power supply, but it should provide at least
1 ampere at 5 volts.
(Chargers from newer Apple MacBooks or iPads unfortunately cannot be used. They work with
"USB Power Delivery", where the devices have to negotiate the current — a function the LoDi components do not support.)
Important note on the power supply: use only the external power supply for our interface. Powering it from the PC can cause a ground loop and interference because of the network connection.
4. Connecting the LoDi-Shift-Commander to the network
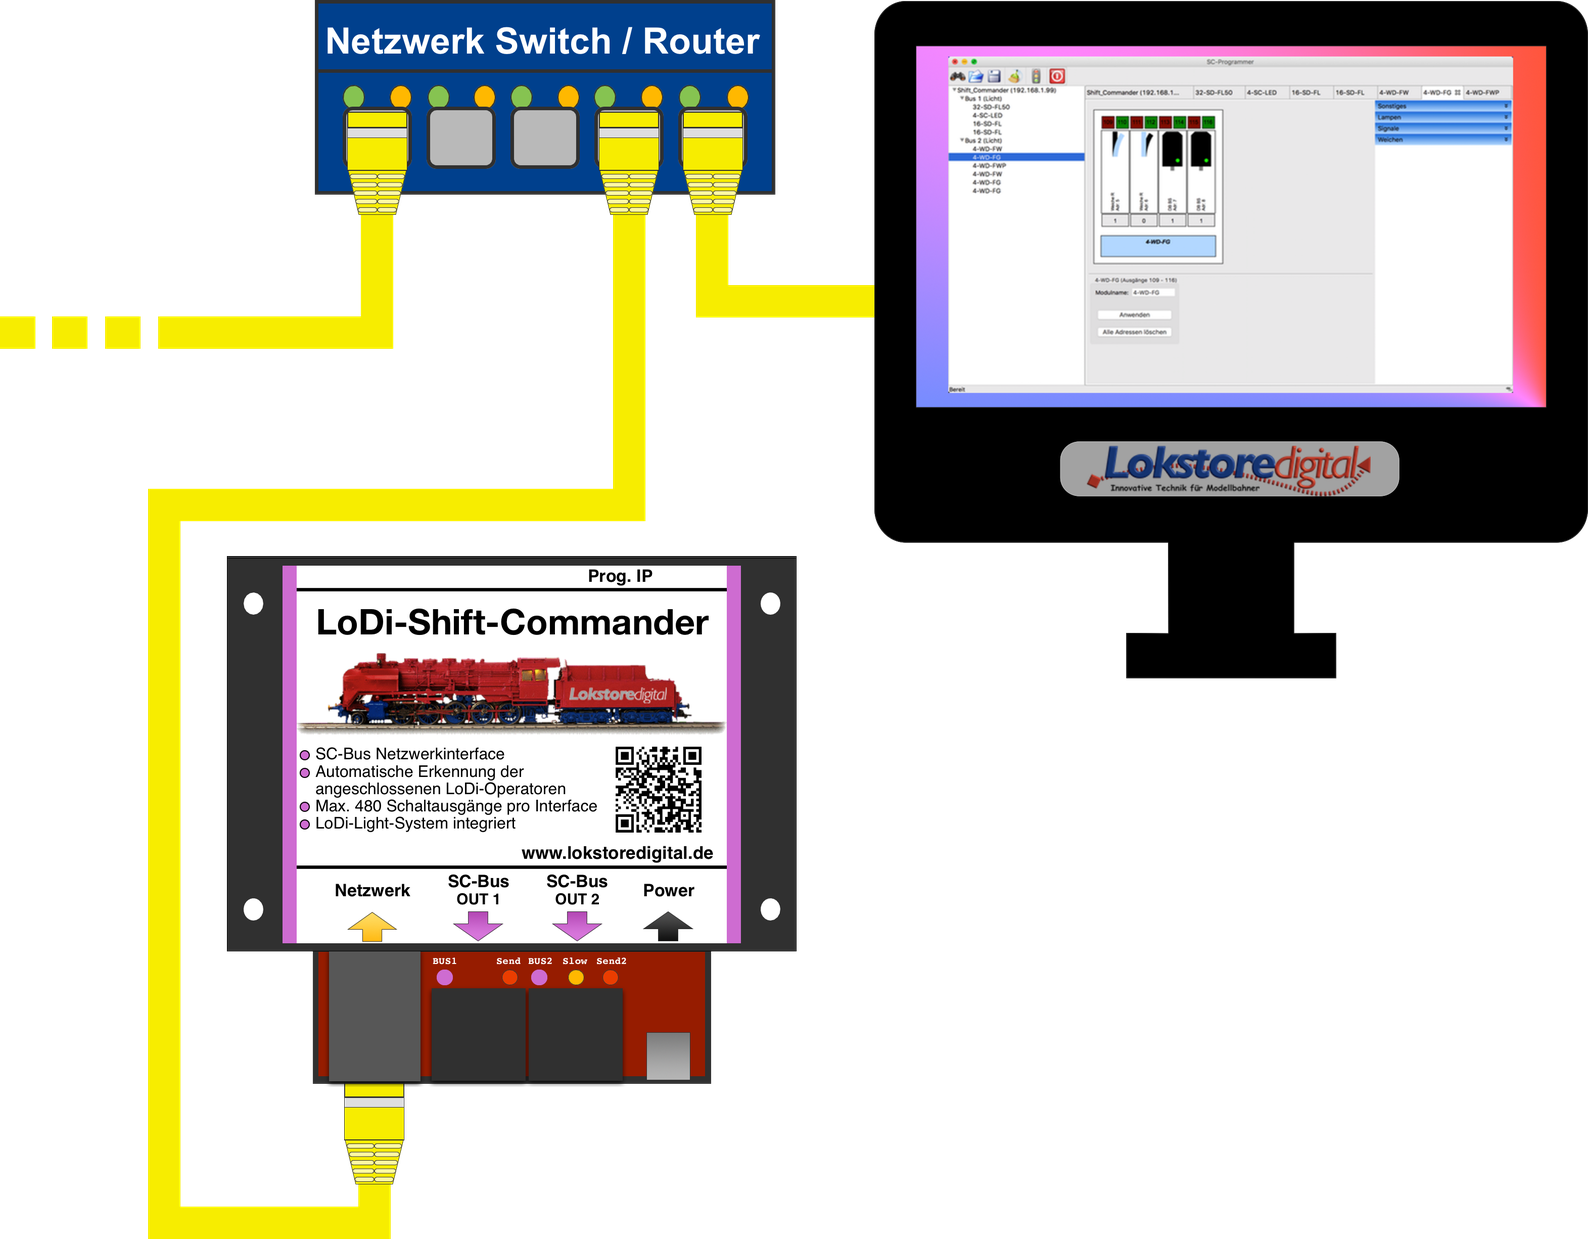
All our devices work with a modern network interface.
That brings you plenty of advantages in handling the devices. This network interface lets you integrate several interfaces into your system without trouble.
There are almost no limits to your imagination here.
This technology lets you build large and very large layouts, but small layouts benefit from it too.
Thanks to networking, controlling your layout from a laptop or tablet is no longer a problem. Today's Wi-Fi routers are perfectly able to carry these connections quickly enough.
There is little to watch out for when bringing the LoDi interface into your network.
It is always easier to integrate the LoDi interface into an existing network than to install another network card in the computer.
If you need help with the integration, do get in touch with us through the contact form, or turn to our users in the forum, who will gladly help.
As the picture above shows, we pay close attention to the colour coding of network cables. Yellow is the international standard for computer networks.
You are of course free to use other colours; we stick to these standards.
In the example shown, the computer is connected to a switch or router.
You can of course also connect the computer over Wi-Fi.
The LoDi-Shift-Commander is attached to the switch or router as well.
The cable running off to the left could be your internet line, or other devices connected to your network.
If the ports on the switch or router run out, simply connect another switch to the existing one. The link channels of the switches route the data to the right device automatically; you only have to plug the cables in. Please take care not to build a loop, though — a loop is a circle, so to speak, that will bring your network down.
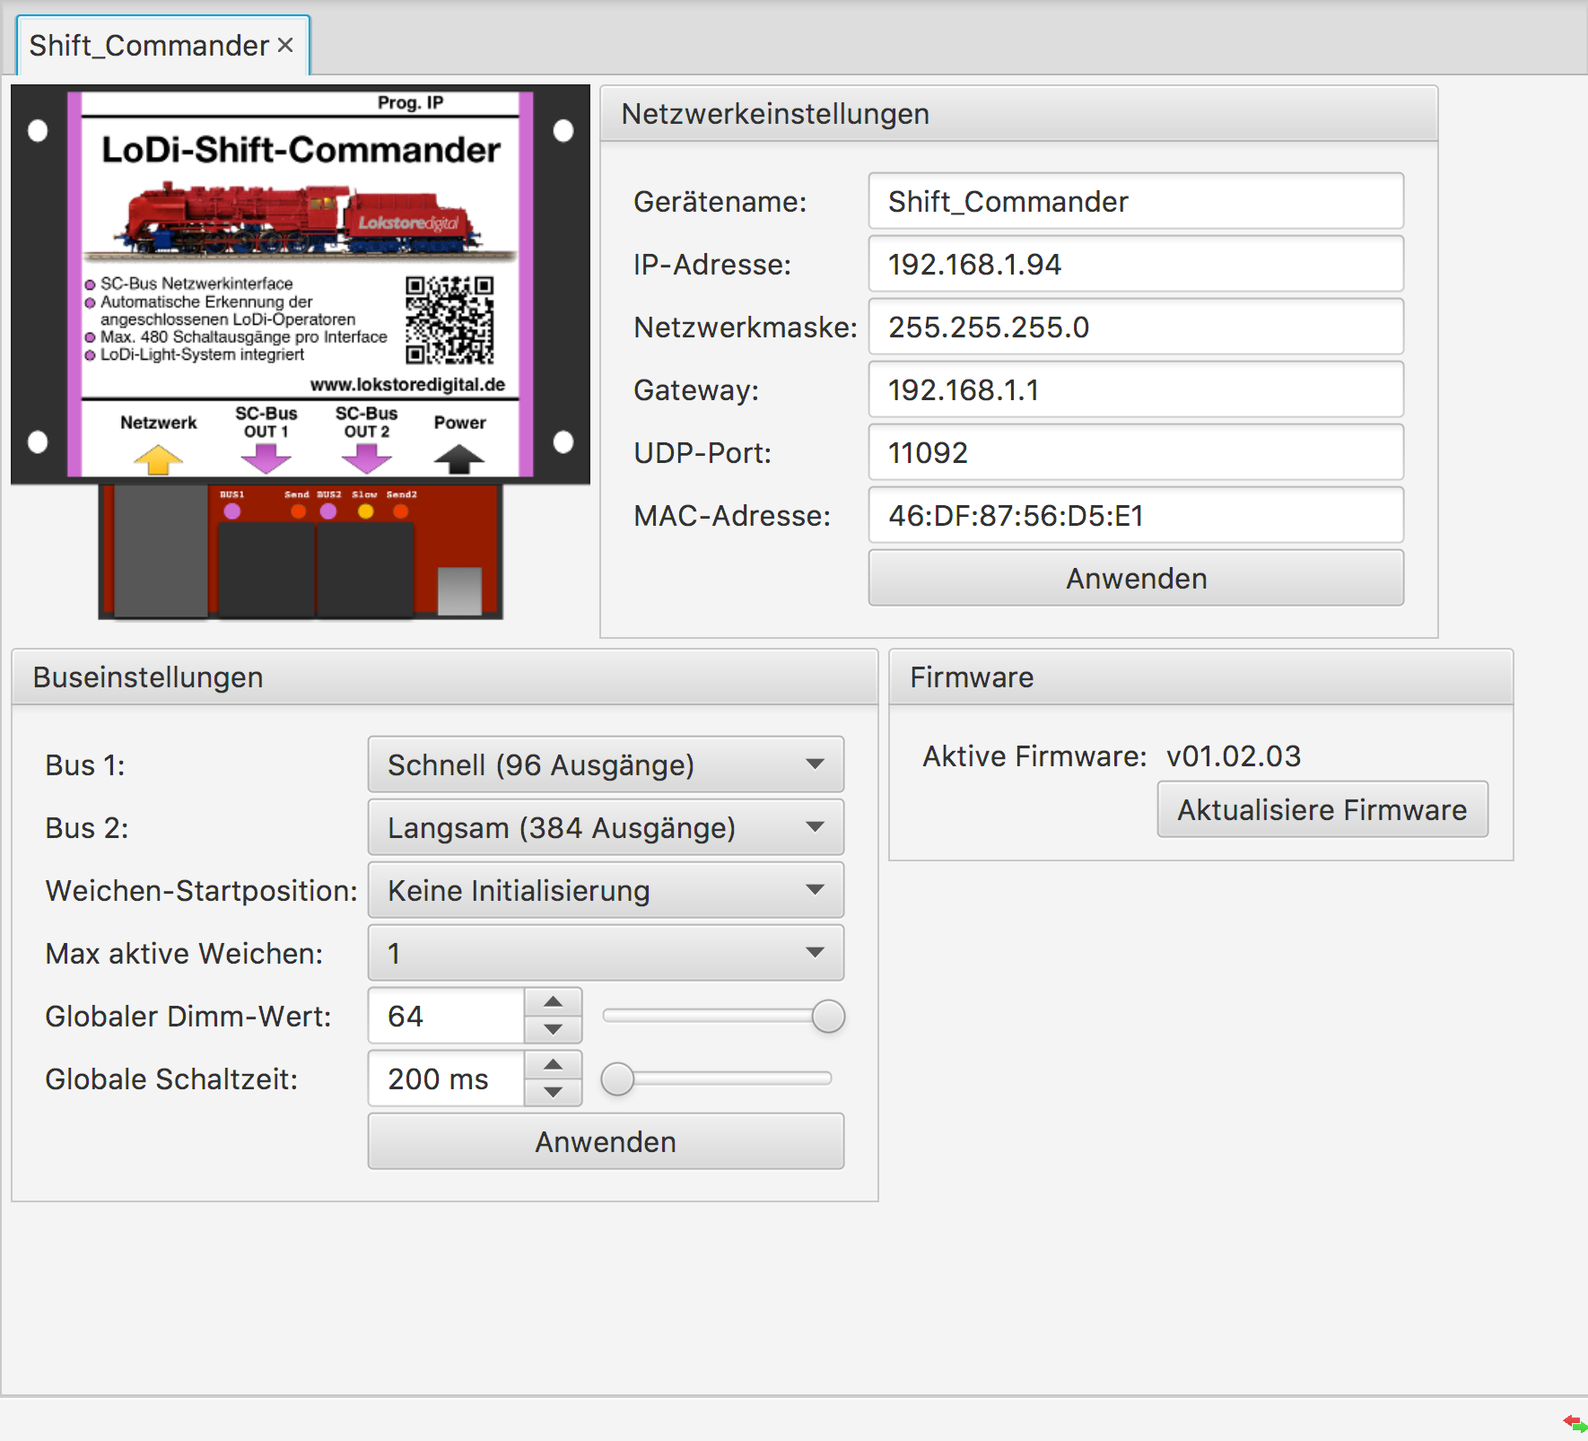
Once the LoDi interface is connected correctly, the next step is configuring the network address (the IP address) through our LoDi-ProgrammerFX.
5. Technical data
| Property | Value |
|---|---|
| Dimensions | Length 8.9 cm |
| Width | 10 cm |
| Height | 3.5 cm |
| Weight | 89 grams |
The USB-C connection can be powered from any common USB-C cable or power supply.
The maximum load of the USB power supply may be up to 3 amperes.
6. Setting up the LoDi-Shift-Commander in the LoDi-ProgrammerFX
Here is how to commission the IP address of the LoDi-Shift-Commander
Here is how to set up the LoDi-Shift-Commander
7. LoDi-Shift-Commander PDF download
Here you can download a summary of the LoDi-Shift-Commander hardware and software as a PDF.